
REST has reigned for a long time in the world of web services. It's easy to implement, allows standardization through RESTful patterns and has lots of libraries that support and facilitate its development. Then came GraphQL, the famous query language for APIs.
Now that you're diving into GraphQL and Node.js, this might be the time to learn about monitoring GraphQL and Node.js too.
What’s GraphQL
To better understand GraphQL, we need to look at what defines it. GraphQL was created to be:
- declarative — meaning, you should have the power to choose the data that you want. In other words, you query (request for) some data, defining exactly what you want to get (that is where the schema comes in).
- compositional — just like it is in many programming language objects, you can have one field inheriting from another or inside another. Or from both, if you prefer.
- strongly-typed — once a field has its type defined, that’s it—a different type isn't allowed.
- self-documented — the schema, by itself, offers great documentation (with data types, structure, queries and mutations, etc.).
- less verbose — we only get what we asked, which greatly differs from REST, which gives you everything (which isn't very efficient, especially if this everything means a lot of unnecessary data).
- among others.
GraphQL is a whole new paradigm. It brings to light the discussion of whether your APIs should have organized and well-structured request and response data in the same way we have when programming data structures in our back-end applications.
The more the number of points discussed above that your API lacks, the more of an indicator that it could benefit from GraphQL. But you don’t have to abruptly migrate to it. Some developers start slowly by creating and exposing some endpoints and asking the clients to consume them. In that way, they gather more insight from both sides that determine if that’s the right path to take.
When it comes to the Node.js universe, we have a bunch of useful tools to help out. express-graphql, for example, is one of the popular server middlewares for integrating GraphQL with Node.js. Apollo is a piece of cake in terms of GraphQL APIs development. It embraces some of the downsides of express-graphql, like the easy enabling of graphql-tools and its patterns. We’ll see more on this later.
Let’s go to some practical stuff. Nothing better than seeing in action how GraphQL fits into a common API example. For this, we’ll be creating a complete API to access some beer data.
First, our API example will enable the registration, login and authentication of users. This way, we can ensure it's secure and unauthorized users can't see our favorite beer list.
Then, we’ll dive into the construction of our API operations, set up a Postgres database to store the credentials and tokens, as well as test everything out.
After we finish, we can celebrate with a beer from our list. So let’s get started.
👋 Did you know that AppSignal APM for Node.js has automatic instrumentation for Apollo? And all the slow API requests automatically show up on the Slow API screen.
Setting Up Our Project
The example we’re about to develop expects that you have Node.js installed. Make sure that it's at least version 8.0.
Next, select a folder of your preference and run the following commands:
1npm init -y
2npm i apollo-server-express bcrypt express express-jwt graphql jsonwebtoken pg pg-hstore sequelize
3npm install -g sequelize-cli
They initialize our Node project with default settings, install the npm dependencies required for the GraphQL + Apollo example, and install the Sequelize CLI Tool, respectively.
Regarding the dependencies, we have:
apollo-server-express: provides direct connection between Express and Apollo GraphQL server.
graphql: the implementation per se of GraphQL in JavaScript.
bcrypt: it’ll be used to hash our passwords.
express and express-jwt: the Express framework itself along with the middleware for validating JWT (JSON Web Tokens) via the jsonwebtoken module. There are a bunch of ways of dealing with the authentication process, but in this article, we’ll make use of JWT bearer tokens.
pg and pg-hstore: the client for Postgres and the serializer/deserializer of JSON to hstore format (and vice versa).
sequelize: the Node.js ORM for Postgres (among other databases) that we’ll use to facilitate the job of communicating with the database.
Note that the Sequelize CLI tool had to be installed globally, otherwise, it wouldn’t be available at any command line interface. As its first command, let’s run the one that will initialize our Node project as an ORM one:
1sequelize initIt will create some folders related to the ORM framework, like models, config and migrations (since the framework also handles the migration of our databases).
Now, let’s move on to the database related configs. First of all, we need a real Postgres database. If you still don’t have Postgres installed, then go ahead. As a GUI tool for managing the database, we’ll use pgAdmin. We'll use the web GUI that comes with it.
Next, we’ll create our example’s database. For this, access the web pgAdmin window and create it:
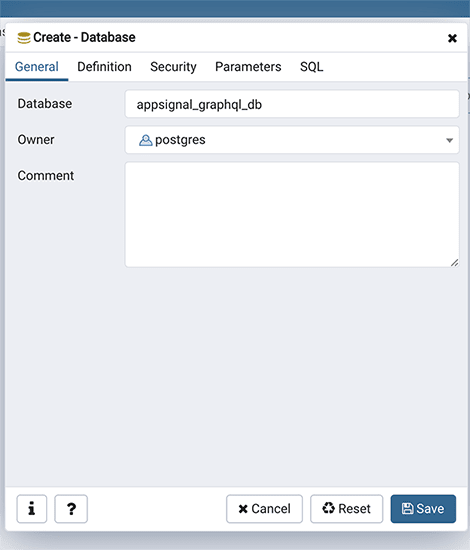
Then, go back to the project and update the content of config/config.json as shown:
1"development": {
2    "username": "postgres",
3    "password": "postgres",
4    "database": "appsignal_graphql_db",
5    "host": "127.0.0.1",
6    "dialect": "postgres",
7    "operatorsAliases": false
8},
We’re only showing the development section since it’s the only one we’ll be dealing with in the article. However, make sure to update the other related ones as well before deploying your app to production.
Next, let’s run the following command:
1sequelize model:generate --name User --attributes login:string,password:stringThis is another command from Sequelize framework that creates a new model in the project—the user model, to be exact. This model will be important to our authentication structure. Go ahead and take a look at what's been generated in the project.
For now, we’ll only create two fields: login and password. But feel free to add any other fields you judge important to your design.
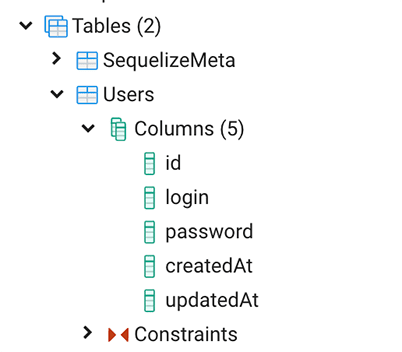
You may also notice a new file created under the migrations folder. There, we have the code for the user’s table creation. In order to migrate the changes to the physical database, let’s run:
1sequelize db:migrateNow you can check the results in pgAdmin:
You may wonder where's the table that will store our beer data. We won’t store it in the database. The reason is that I’d like to demonstrate both paths: fetching from the db and from a static list in the JavaScript code.
The project’s set. Now we can move on to implementing the authentication.
Let’s Authenticate!
The authentication must be implemented first because no other API method should be exposed without proper safety.
Let’s start with the schema. The GraphQL schema is the recipe that the API clients must follow to properly use the API. It provides the exact hierarchy of field types, queries and mutations that your GraphQL API is able to execute. It is the contract of this client-server deal. With very strong and clear clauses, by the way.
Our schema should be placed in the schema.js file. So, create it and add the following content:
1const { gql } = require("apollo-server-express");
2
3const typeDefs = gql`
4  type User {
5    id: Int!
6    login: String!
7  }
8
9  type Beer {
10    id: Int!
11    name: String!
12    brand: String
13    price: Float
14  }
15
16  type Query {
17    current: User
18    beer(id: Int!): Beer
19    beers(brand: String!): [Beer]
20  }
21
22  type Mutation {
23    register(login: String!, password: String!): String
24    login(login: String!, password: String!): String
25  }
26`;
27
28module.exports = typeDefs;
For more details on how the schema is structured, please refer to this. In short, the Query type is where we place the API methods that only return data, and the Mutation type is where the methods that create or change data go.
The other types are our own types, like Beer and User—the ones we create to reflect the JavaScript model that will be defined in the resolvers.
The gql tag is used to infer syntax highlighting to your editor plugin (like Prettier). It helps to keep the code organized.
The resolvers, in turn, are the executors of the methods defined in the schema. While the schema worries about the fields, types and results of our API, the resolver takes all this as reference and implements the execution behind.
Create a new file called resolvers.js and add the following:
1const { User } = require("./models");
2const bcrypt = require("bcrypt");
3const jsonwebtoken = require("jsonwebtoken");
4
5const JWT_SECRET = require("./constants");
6
7const resolvers = {
8  Query: {
9    async current(_, args, { user }) {
10      if (user) {
11        return await User.findOne({ where: { id: user.id } });
12      }
13      throw new Error("Sorry, you're not an authenticated user!");
14    },
15  },
16
17  Mutation: {
18    async register(_, { login, password }) {
19      const user = await User.create({
20        login,
21        password: await bcrypt.hash(password, 10),
22      });
23
24      return jsonwebtoken.sign({ id: user.id, login: user.login }, JWT_SECRET, {
25        expiresIn: "3m",
26      });
27    },
28
29    async login(_, { login, password }) {
30      const user = await User.findOne({ where: { login } });
31
32      if (!user) {
33        throw new Error(
34          "This user doesn't exist. Please, make sure to type the right login."
35        );
36      }
37
38      const valid = await bcrypt.compare(password, user.password);
39
40      if (!valid) {
41        throw new Error("You password is incorrect!");
42      }
43
44      return jsonwebtoken.sign({ id: user.id, login: user.login }, JWT_SECRET, {
45        expiresIn: "1d",
46      });
47    },
48  },
49};
50
51module.exports = resolvers;
The resolvers follow a pattern that’s inherently async because it’s Promise-based. Each operation must have the exact same signature as the one defined in the schema.
Note that, for all query operations, we’re receiving a third argument: user. That one is going to be injected via context (still to be configured in index.js).
The jsonwebtoken dependency now takes over signing in the user according to the provided credentials and then generating a proper JWT token. This action will happen in both registration and login processes.
Also, notice that an expiry time must be set for the token.
Finally, there’s a JWT_SECRET constant that we’re using as the value for secretOrPrivateKey. That is the same secret we’ll use in the Express JWT middleware to check if the token is valid.
This constant will be placed in a new file, called constants.js. Here’s its content:
1const JWT_SECRET = "sdlkfoish23@#$dfdsknj23SD";
2
3module.exports = JWT_SECRET;
Make sure to change the value to a safe secret of yours. The only requirement is that it be long.
Now, it’s time to configure our index.js file. Substitute its content with the following:
1const express = require("express");
2const { ApolloServer } = require("apollo-server-express");
3const jwt = require("express-jwt");
4const typeDefs = require("./schema");
5const resolvers = require("./resolvers");
6const JWT_SECRET = require("./constants");
7
8const app = express();
9const auth = jwt({
10  secret: JWT_SECRET,
11  credentialsRequired: false,
12});
13app.use(auth);
14
15const server = new ApolloServer({
16  typeDefs,
17  resolvers,
18  playground: {
19    endpoint: "/graphql",
20  },
21  context: ({ req }) => {
22    const user = req.headers.user
23      ? JSON.parse(req.headers.user)
24      : req.user
25      ? req.user
26      : null;
27    return { user };
28  },
29});
30
31server.applyMiddleware({ app });
32
33const PORT = process.env.PORT || 3000;
34app.listen(PORT, () => {
35  console.log("The server started on port " + PORT);
36});
If you use Express as your web server, this code may look familiar, except for the fact that we have two servers being set here.
Express app is going to be used as usual. We’re creating it, adding a middleware (jwt) and starting it up. However, the ApolloServer may come along to add the necessary GraphQL settings.
ApolloServer receives the schema (typeDefs), resolvers, playground and a context as arguments. The playground property states which endpoint is going to redirect to Prisma’s GraphQL Playground view. It is a built-in IDE to help us with testing of our GraphQL APIs.
The context, in turn, is an optional attribute that allows us to make quick conversions or validations prior to the GraphQL query/mutation executions. In our case, we’ll use it to extract the user object from the request and make it available to our resolvers functions.
The server object is the one that applies the middleware, passing the app object as a param.
This is it. Let’s test it now. Run the application with the following command:
1node index.jsThen, access the address http://localhost:3000/graphql and the Playground view will show up.
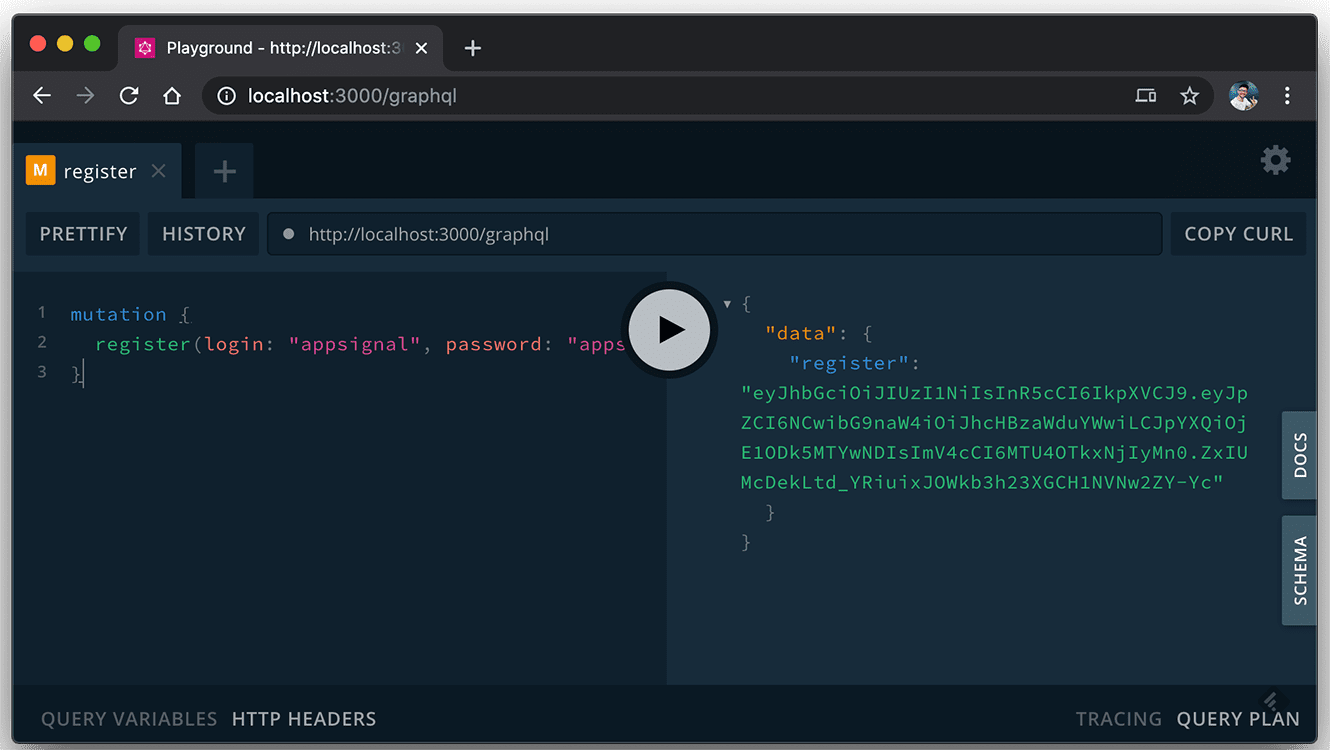
Our first test will be to register a new valid user. So, paste the following snippet into the query area and hit the “Execute Query” button:
1mutation {
2  register(login: "john", password: "john")
3}
A valid token will return as shown in the figure below:
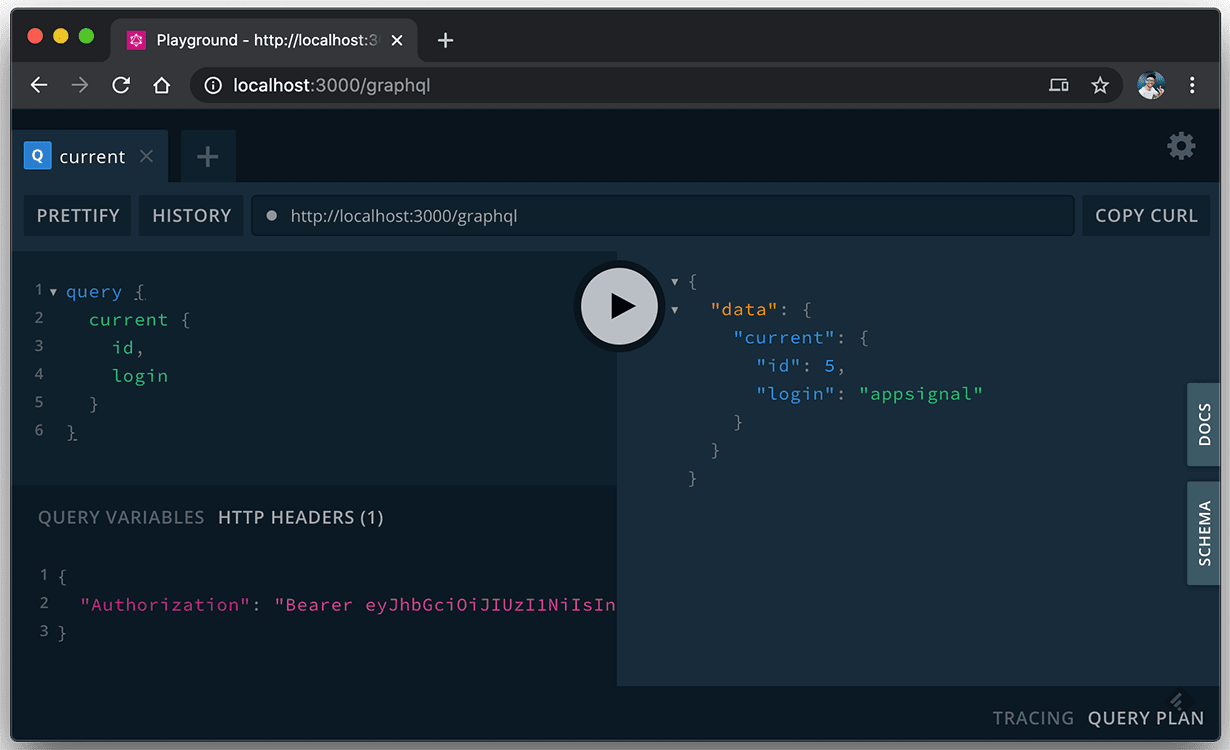
This token can already be used to access sensitive methods, like the current.
If you don’t provide a valid token as an HTTP header, the following error message will be prompted:

To send it properly, click the “HTTP HEADERS” tab at the bottom of the page and add the following:
1{
2  "Authorization": "Bearer eyJhbGciOiJIUzI1NiIsInR5cCI6IkpXVCJ9.eyJpZCI6NSwibG9naW4iOiJhcHBzaWduYWwiLCJpYXQiOjE1ODk5MTYyNTAsImV4cCI6MTU4OTkxNjQzMH0.bGDmyi3fmEaGf3FNuVBGY7ReqbK-LjD2GmhYCc8Ydts"
3}
Make sure to change the content after Bearer to your version of the returned token. You will have a result similar to the figure below:
Obviously, if you already have a registered user, you can get the token by logging in via login mutation:
1mutation {
2  login(login: "appsignal", password: "appsignal")
3}
Once again, if one of your credentials is wrong, you’ll get the corresponding error message.
Our Beer API
For the sake of simplicity, we won’t create our Beer domain in the database. A single JS file will do the job. But I’d recommend that you migrate to our ORM model as well, making use of the knowledge you’ve got so far.
Let’s start with this, then. This is the code for our beers.js file (make sure to create it too):
1var beersData = [
2  {
3    id: 1,
4    name: "Milwaukee's Best Light",
5    brand: "MillerCoors",
6    price: 7.54,
7  },
8  {
9    id: 2,
10    name: "Miller Genuine Draft",
11    brand: "MillerCoors",
12    price: 6.04,
13  },
14  {
15    id: 3,
16    name: "Tecate",
17    brand: "Heineken International",
18    price: 3.19,
19  },
20];
21
22module.exports = beersData;
Feel free to add more data to it. I reserve the right of not knowing their correct prices.
Once the main GraphQL setup structure has been set, adding new operations is quite easy. We just need to update the schema with the new operations (which we’ve already done) and add the corresponding functions into the resolvers.js.
These are the new queries:
1async beer(_, { id }, { user }) {
2    if (user) {
3        return beersData.filter((beer) => beer.id == id)[0];
4    }
5    throw new Error("Sorry, you're not an authenticated user!");
6},
7
8async beers(_, { brand }, { user }) {
9    if (user) {
10        return beersData.filter((beer) => beer.brand == brand);
11    }
12    throw new Error("Sorry, you're not an authenticated user!");
13},
They’re simply filtering the data based on the given arguments. Don’t forget to import the beersData array object:
1const beersData = require("./beers");Restart the server and refresh your Playground page. Note that we made those new queries safe too, so it means you’ll need to provide a valid token as header.
This is the result of a query by brand:
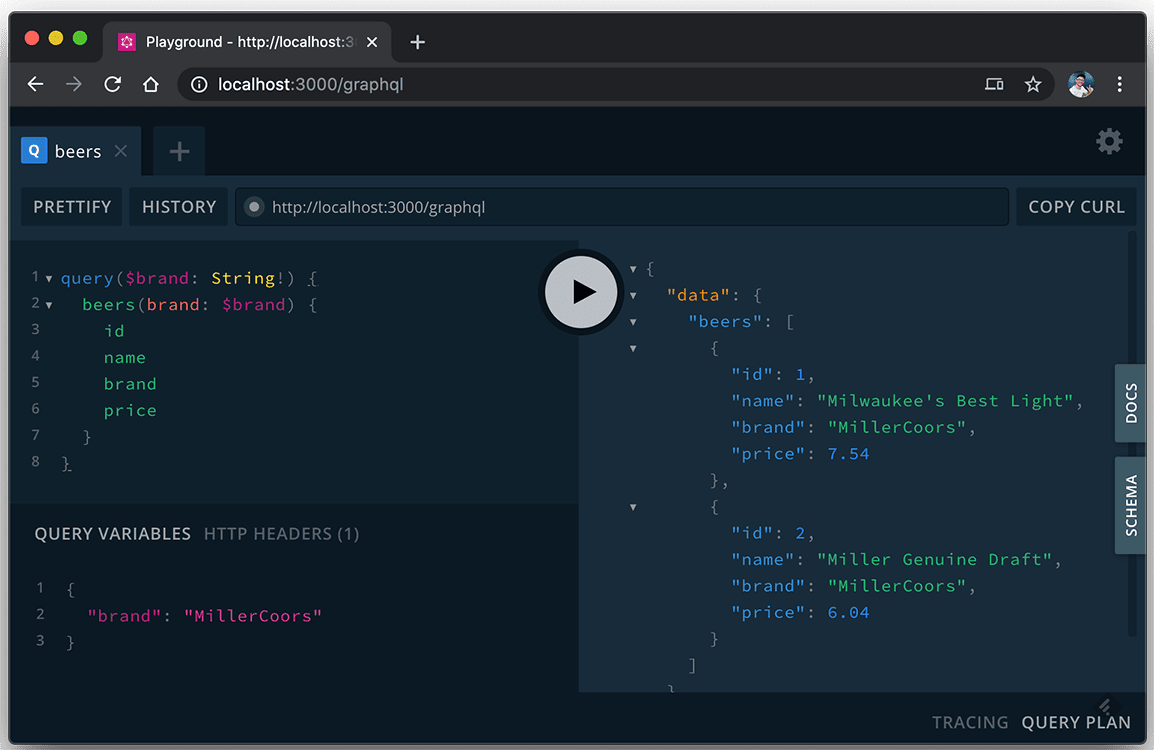
In this call, we’re making use of Query Variables. It allows you to call GraphQL queries by providing arguments dynamically. It’s very useful when you have other applications calling the GraphQL API, rather than just a single web IDE.
This is the magic of GraphQL. It allows even more complicated query compositions. Imagine, for example, that we need to query two specific beers in one single call, filtering by a list of ids.
Currently, we only have operations that filter by one single id or one single brand name. Not with a list of params.
Instead of going directly to the implementation of a new query function that would do it, GraphQL provides a feature called Fragments. Look how our query would be:
1query getBeers($id1: Int!, $id2: Int!) {
2  beer1: beer(id: $id1) {
3    ...beerFields
4  }
5  beer2: beer(id: $id2) {
6    ...beerFields
7  }
8}
9
10fragment beerFields on Beer {
11  id
12  name
13  brand
14  price
15}
For this case, you’d need to provide the exact beer name for each of the results. The fragment defines from where it’s going to inherit the fields, in our case, from the Beer schema.
Basically, fragments allow you to build a collection of fields and then include them in your queries. Don’t forget to feed the Query Variables tab with the ids:
1{
2  "id1": 1,
3  "id2": 3
4}
The result will look like the following:
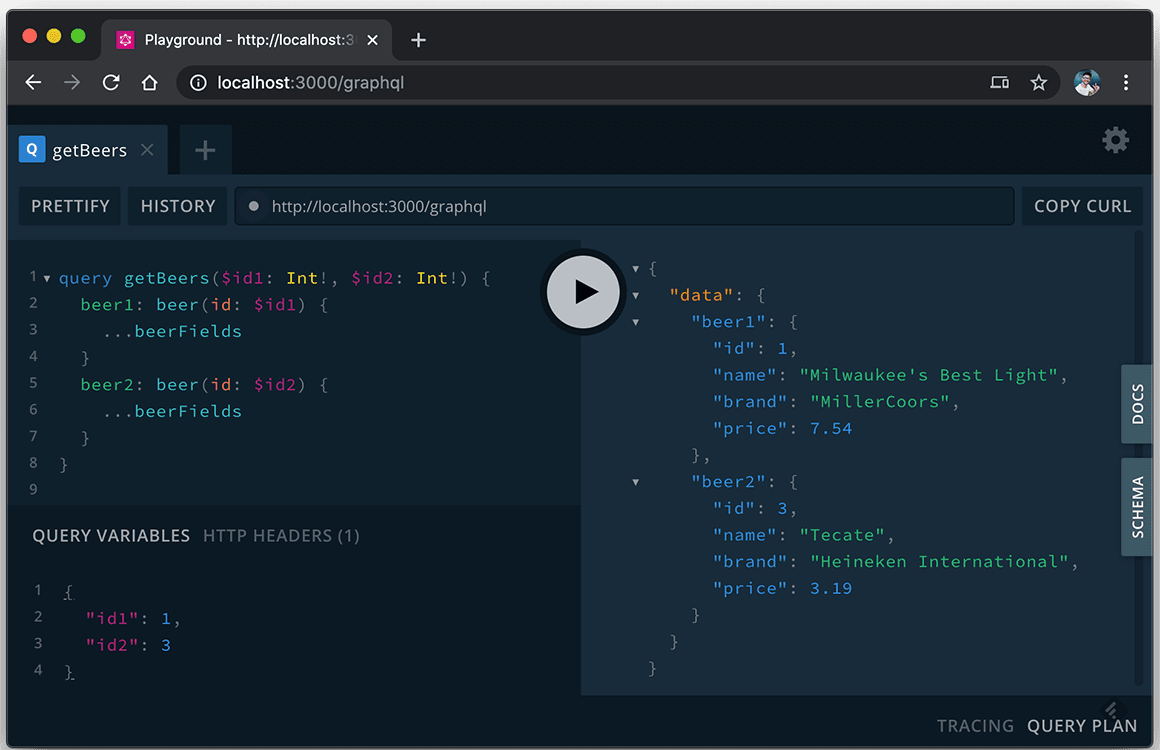
Notice that the Authorization header is also there, hidden in the tab.
Conclusion
It took a while, but we got to the end. Now you have a fully functional GraphQL API designed to provide queries and mutations and, more importantly, in a secure manner.
There is a lot you can add here. Migrate the Beer’s model to store and fetch data directly from Postgres, insert some logs to understand better what’s going on, and place some mutations over the main model.
Apollo + Express + GraphQL have proven to be a great fit for robust and fast web APIs. To learn more, please be sure to visit http://graphql.org/learn/. Great resource!
P.S. If you liked this post, subscribe to our new JavaScript Sorcery list for a monthly deep dive into more magical JavaScript tips and tricks.
P.P.S. If you want to have your GraphQL API monitored without any setup needed, try out AppSignal application monitoring for Node.js.