
Performance is one of the most important aspects of web application development. A fast application will make its users, developers, and business stakeholders happy, while a slow one is sure to frustrate all three parties.
In this article, we will consider some practices that you should adopt to scale your Node.js servers. Your servers will then be able to handle high traffic workloads without a degraded user experience.
By following all of the proven and tested performance tips in this post, you will be able improve the speed and performance of your product, giving it the edge it needs to succeed in the market.
1. Profile and Monitor Your Application
Before you attempt to improve the performance of a system, it's necessary to measure the current level of performance. This way, you'll know the inefficiencies and the right strategy to adopt to get the desired results. Gauging the current level of performance of an application may require running different kinds of tests, such as the following:
- Load testing: refers to the practice of simulating the expected usage of a system and measuring its response as the workload increases.
- Stress testing: designed to measure how a system performs beyond the limits of normal working conditions. Its goal is to determine how much the system can handle before it fails and how it attempts to recover from a failure.
- Spike testing: helps to test the behavior of an application when it receives a drastic increase or decrease in load.
- Scalability testing: used to find the point at which the application stops scaling and identify the reasons behind it.
- Volume testing: determines if a system can cope with large amounts of data.
- Endurance testing: helps evaluate the behavior of a software application under sustained load for a long period, to catch problems such as memory leaks.
Performing some or all of the above tests will provide you with several important metrics, such as:
- response times
- average latency
- error rates
- requests per second
- throughput
- CPU and memory usage
- concurrent users
and more.
After implementing a specific optimization, don't forget to rerun the tests to verify that your changes had the desired effect on system performance.
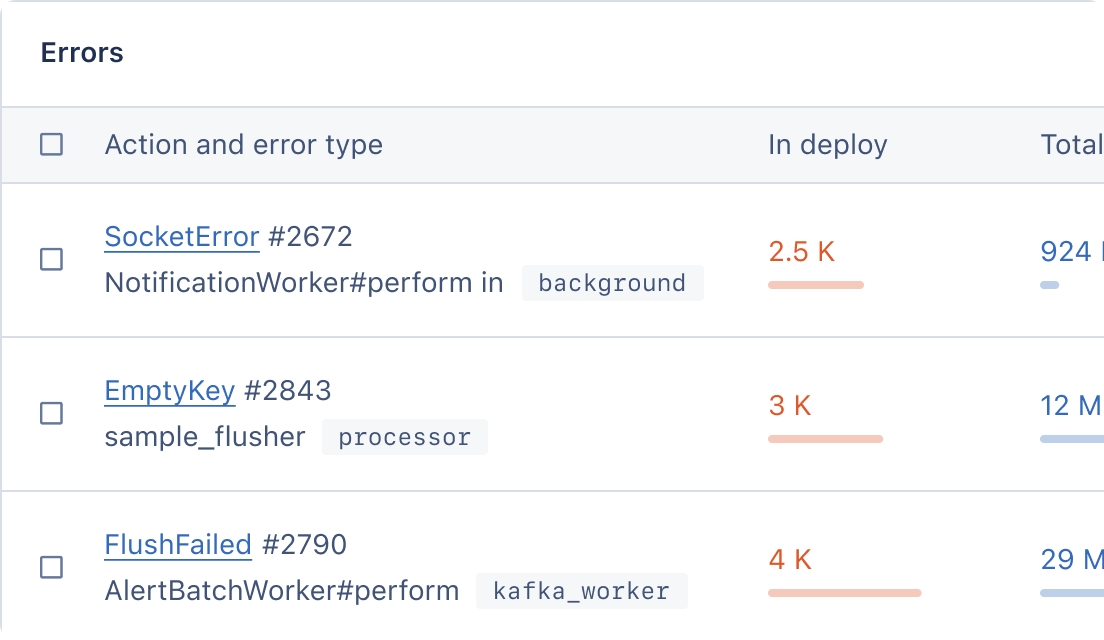
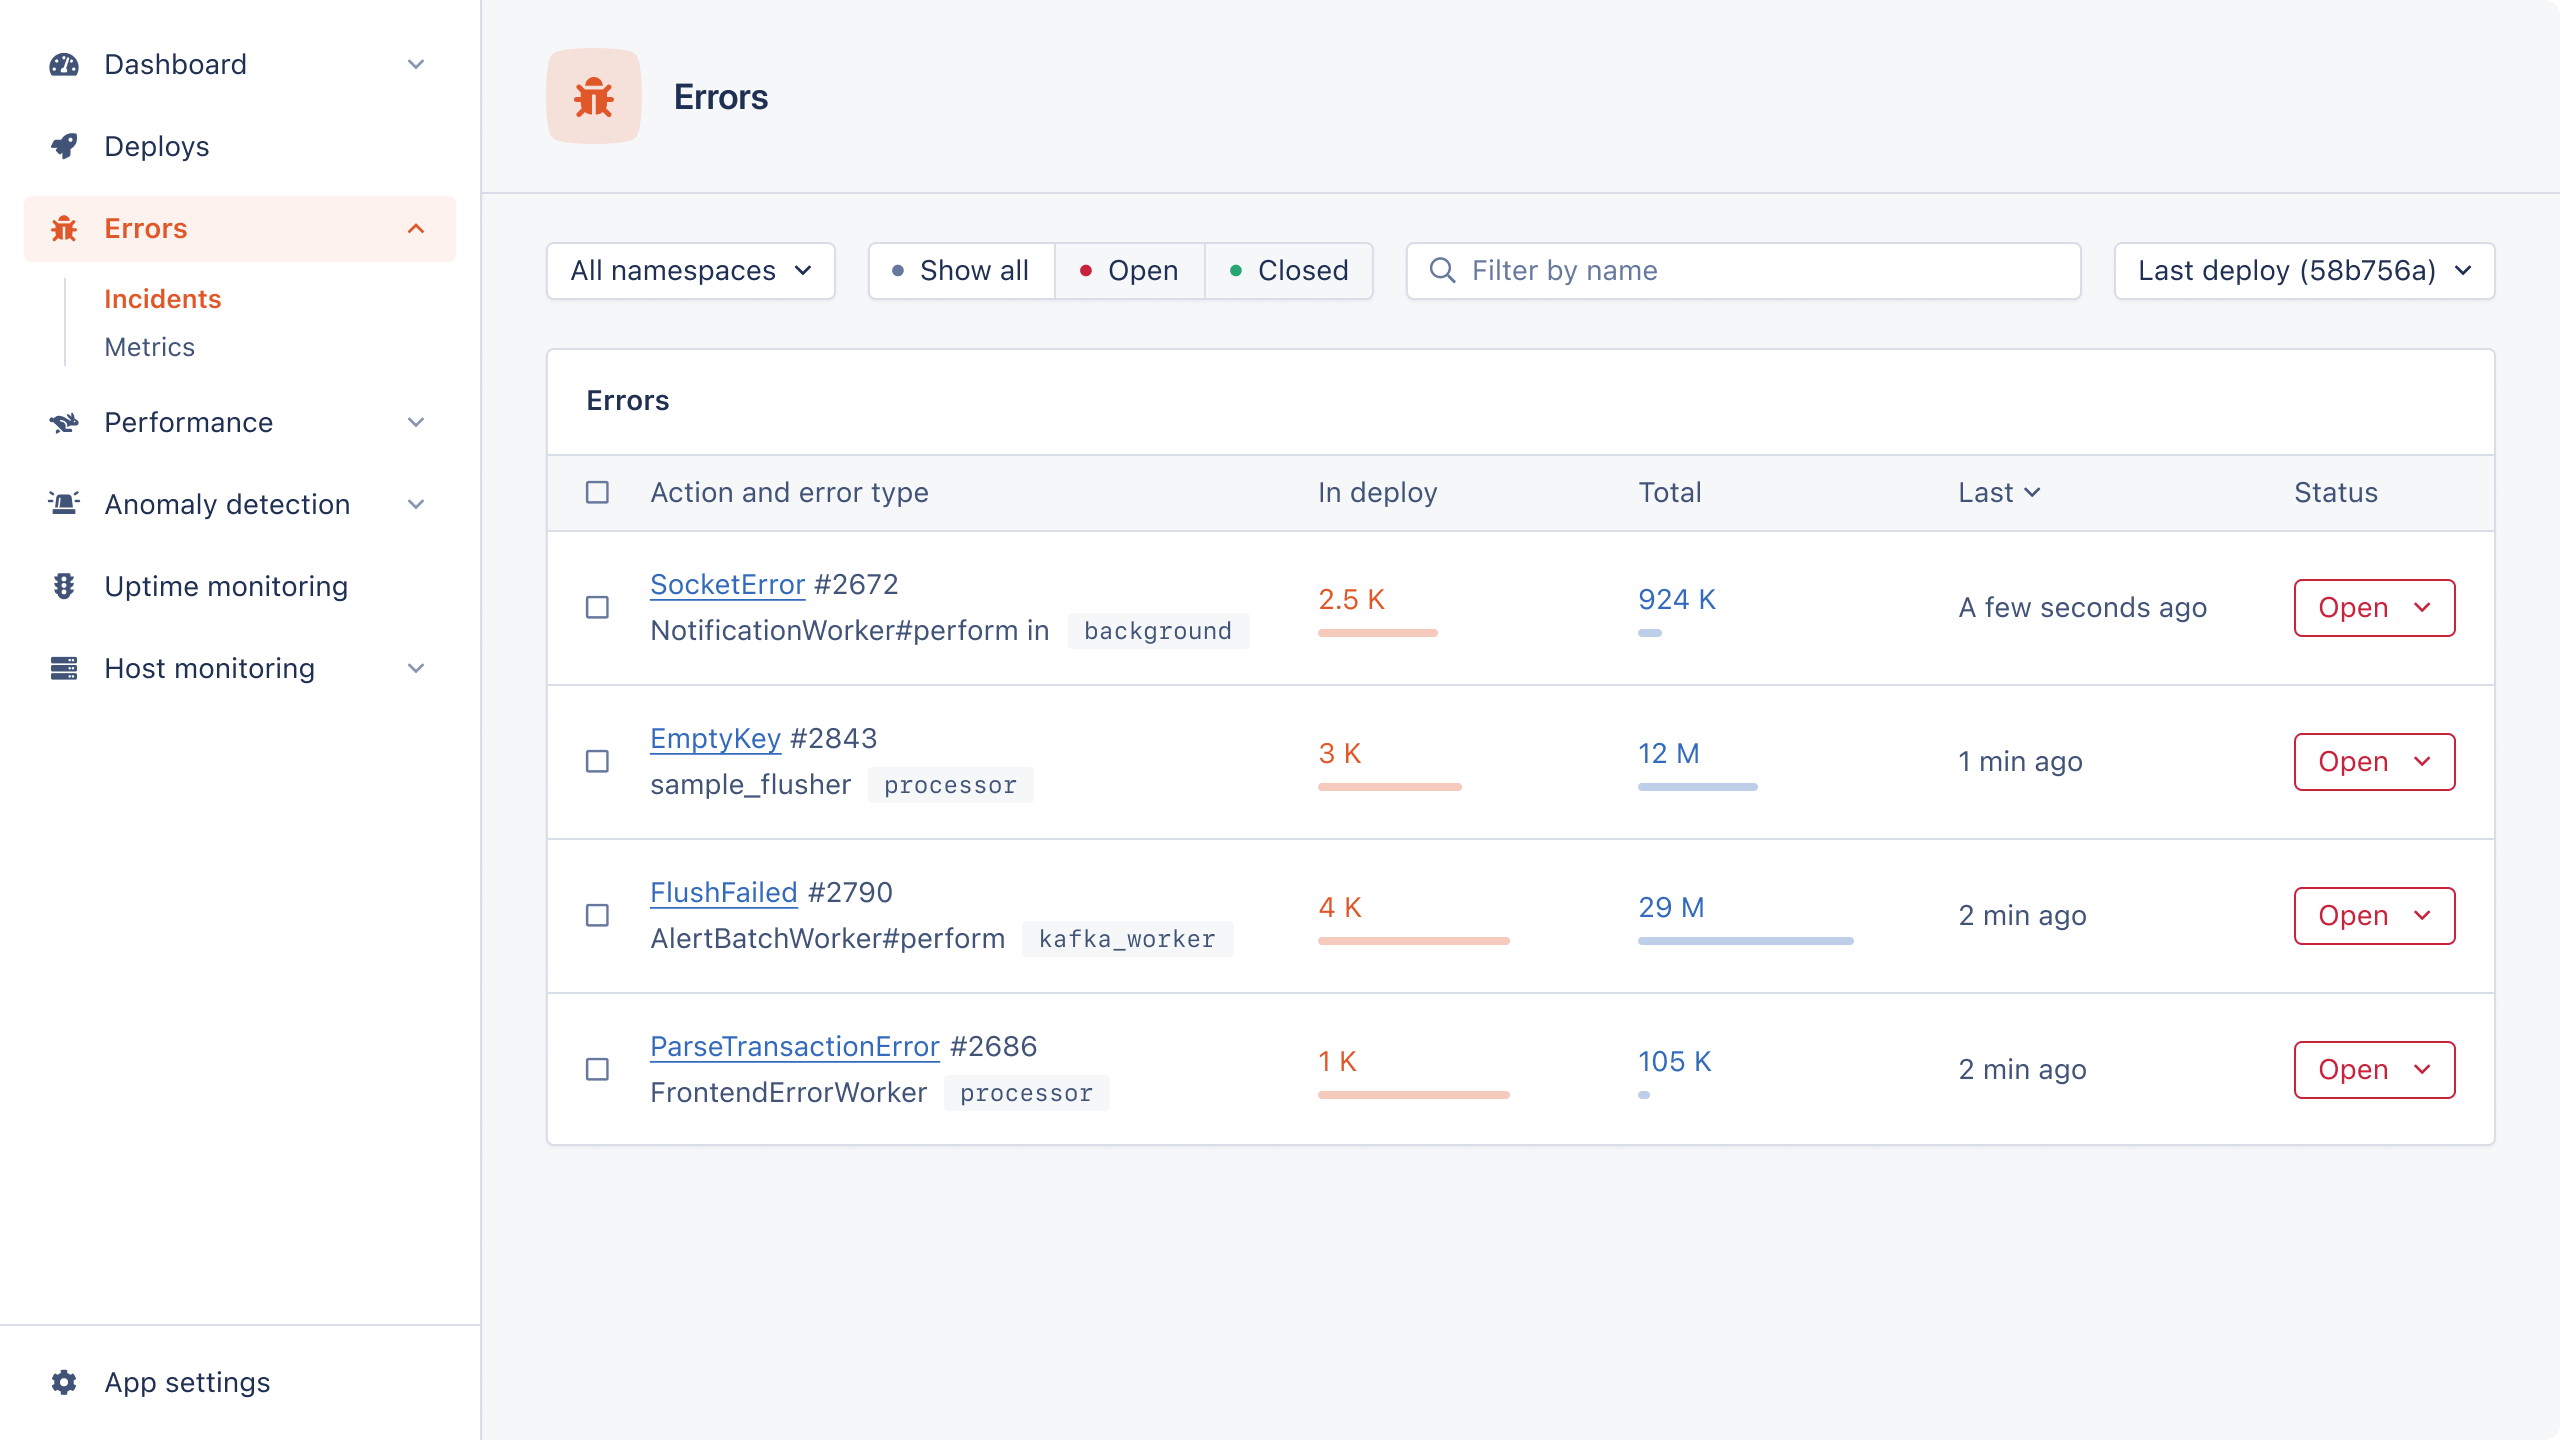
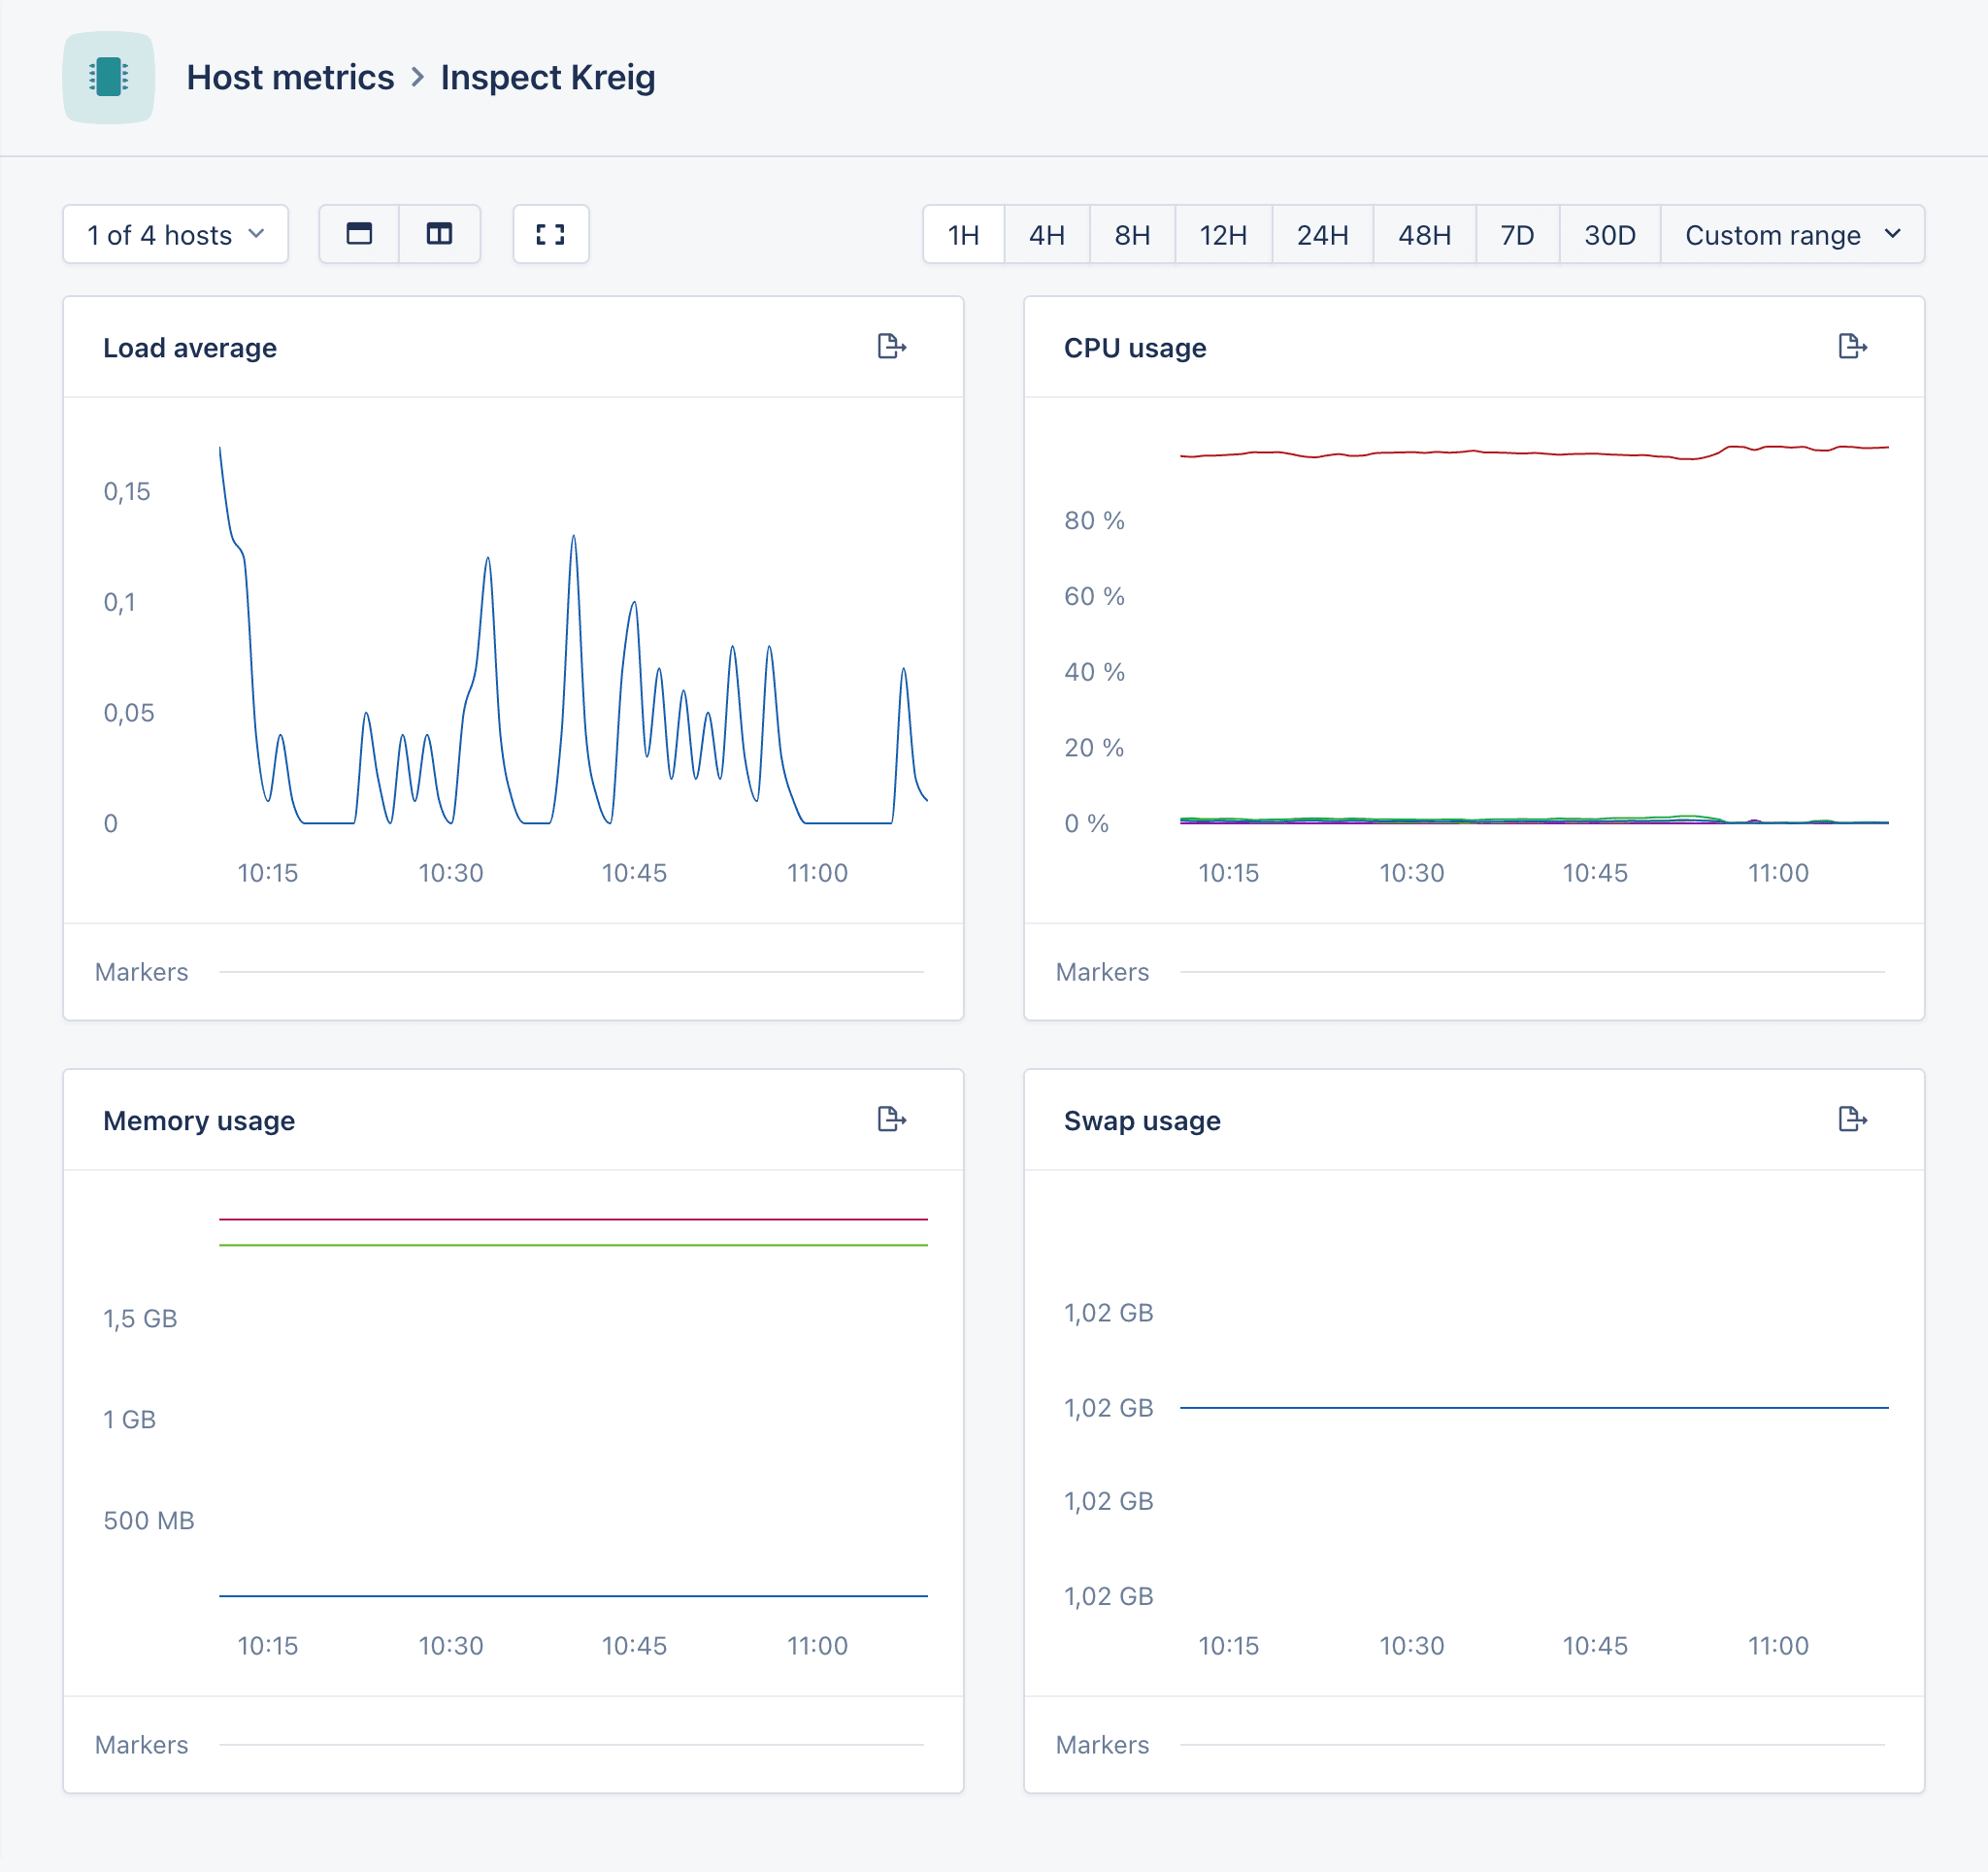
It's also important to utilize an Application Performance Monitoring (APM) tool to keep tabs on the long-term performance of a system. Different monitoring solutions can take care of this this for you. We like AppSignal :).
It's easy to integrate it into your application (just run npx @appsignal/cli install), and it will automatically track several performance metrics such as
response times and throughput alongside error logs, system availability, host
metrics, and more. You can use the insights gained from the data to take
proactive steps to increase system performance or to quickly identify the root
cause of a specific issue so that you can address it promptly before it is
noticed by your users.
2. Reduce Latency Through Caching
Server-side caching is one of the most common strategies for improving the performance of a web application. Its primary aim is to increase the speed of data retrieval, either by spending less time computing such data or doing I/O (such as retrieving such data over the network or from a database).
A cache is a high-speed storage layer used as a temporary store for frequently accessed data. You don't have to retrieve data from the (usually much slower) primary source of the data every time it is requested.
Caching is most effective for data that does not change very often. If your application is receiving lots of requests for the same unchanged data, storing it in a cache is sure to significantly improve the responsiveness of such requests. You can also store the results of computationally intensive tasks in the cache, as long as it can be reused for other requests. This prevents server resources from being bogged down unnecessarily by repeating the work to compute such data.
Another common candidate for caching is API requests that go to an external system. Suppose the responses can be reliably reused for subsequent requests. In that case, it makes sense to store API requests in the cache layer to avoid the additional network request and any other costs associated with the API in question.
A relatively straightforward way to implement caching in a Node.js application is through an in-process caching solution such as node-cache. It involves placing actively used data in memory, where it can be retrieved more quickly. The major problem with an in-process cache is that it's tied to an application process, so it's rarely suitable for distributed workflows (especially when caching mutable objects). In such settings, you may use a distributed caching solution such as Redis or Memcached. These run independently of an application and are more practical when scaling the application onto multiple servers.
3. Use Timeouts When Dealing with I/O Operations
When building Node.js applications, timeouts are amongst the easiest things to get wrong. Your server is probably talking to other external services that themselves might also be calling other services. If one service in the chain is slow or unresponsive, it will result in a slow experience for your end-users. Even if you don't run into this issue during development, you can't guarantee that your dependencies will always respond as fast as they usually do, which is why the concept of timeouts is important.
A timeout is the maximum wait time set on a request. It represents how long a client is prepared to wait for a response from an external service. If the response is not received within the specified limits, the connection will abort so that the application does not hang indefinitely. Many popular libraries for making HTTP requests in Node.js (such as axios) do not set a default timeout, meaning that any remote API can keep your application waiting for the requested resource indefinitely. You should set a request timeout to prevent this from happening:
1const axios = require("axios");
2
3axios.defaults.timeout === 1000; // global timeout of 1s
In the above snippet, a timeout of 1000ms (1s) is set as the default for all HTTP requests made through axios. This guarantees that any request will not take longer than that time, even if the API is unresponsive. You can also set a timeout value on individual requests when the global default is not appropriate:
1axios
2  .get("https://example.com/api", { timeout: 2000 })
3  .then((response) => {
4    console.log(response);
5  })
6  .catch((error) => {
7    console.log(error);
8  });
Note that the axios timeout value is a read timeout, which is different
from a connection timeout. The latter is the time within which a
TCP connection must be established, while the former determines how long the
client will wait for a response after the connection is established.
Usually, the connection timeout is much lower than the read timeout. The client is able to try a different server or alternative API if one service is taking too long to accept a connection. This still gives enough time for the server to generate a response once the connection is accepted.
At the moment, axios does not support setting a connection timeout separately from a read timeout, which could be limiting in some scenarios. If you need this functionality, you can try the got library - it allows for separate read and connection timeout specifications.
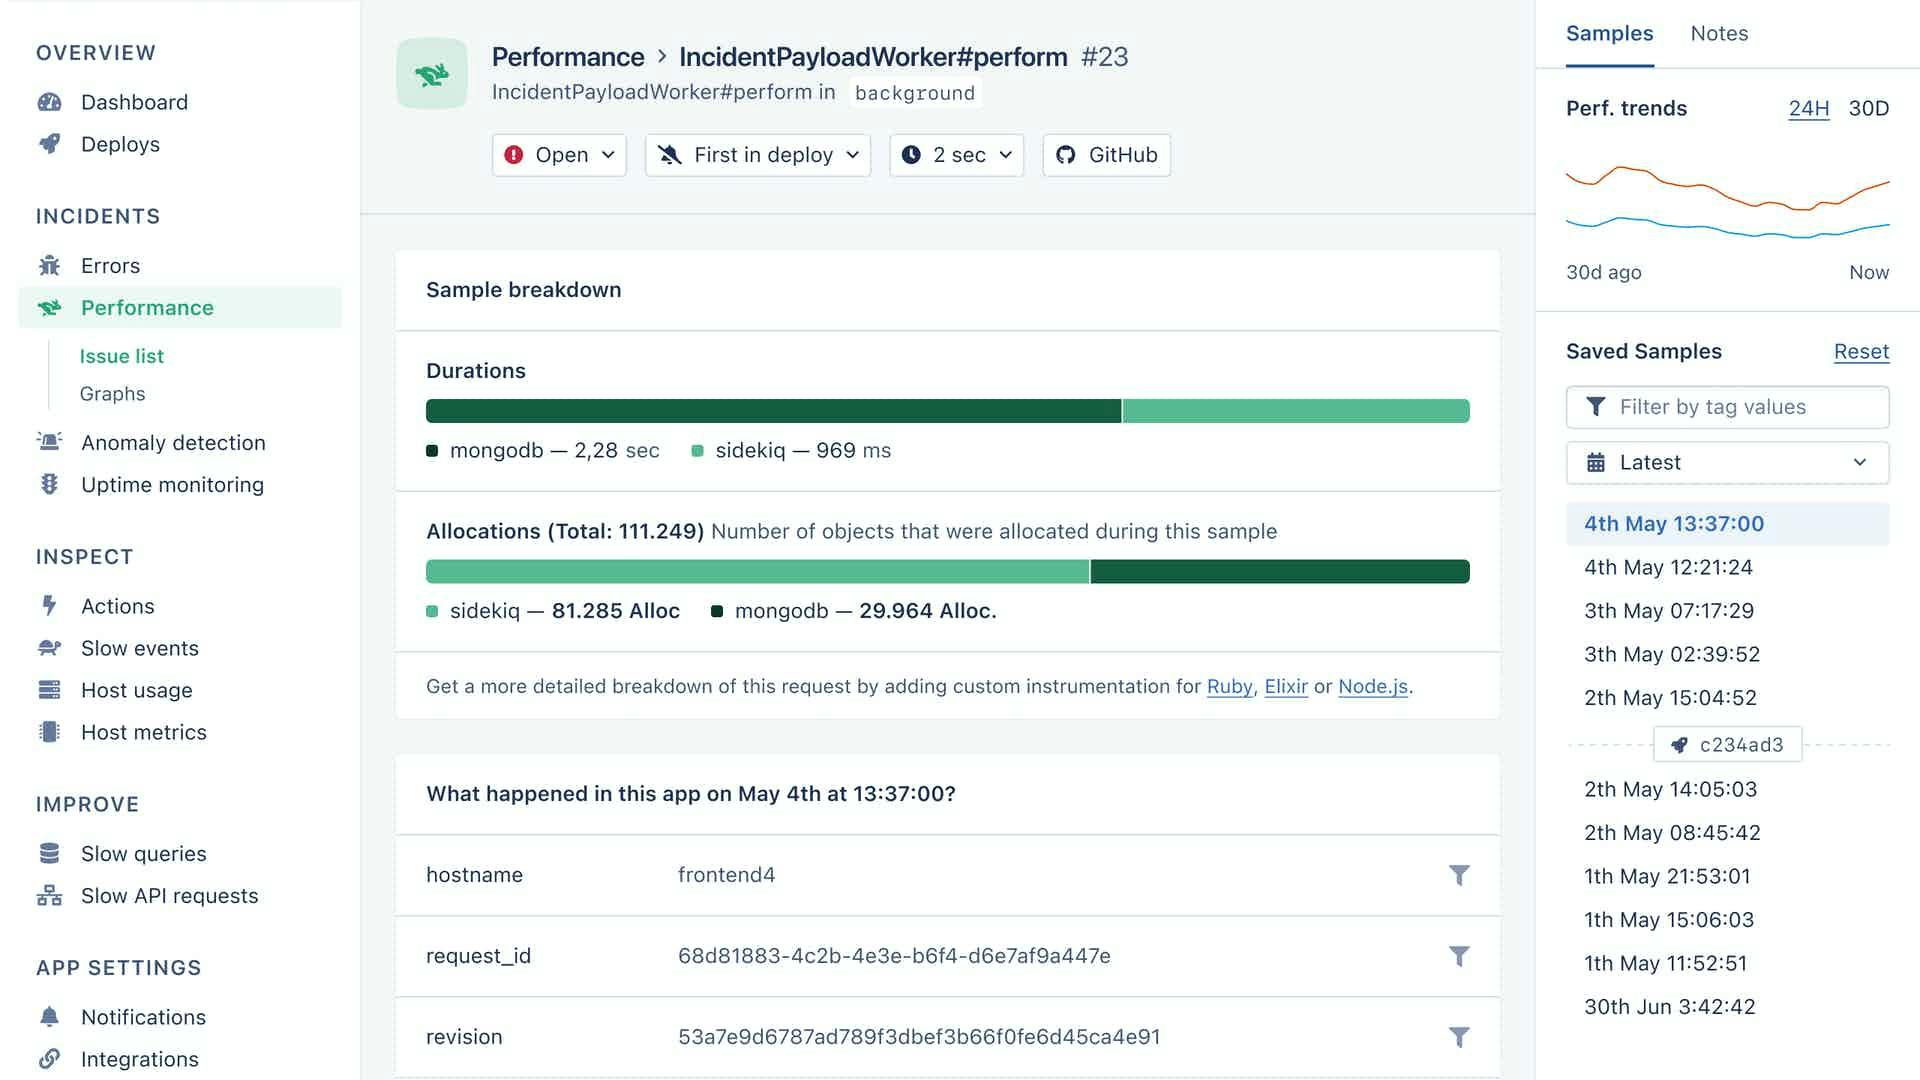
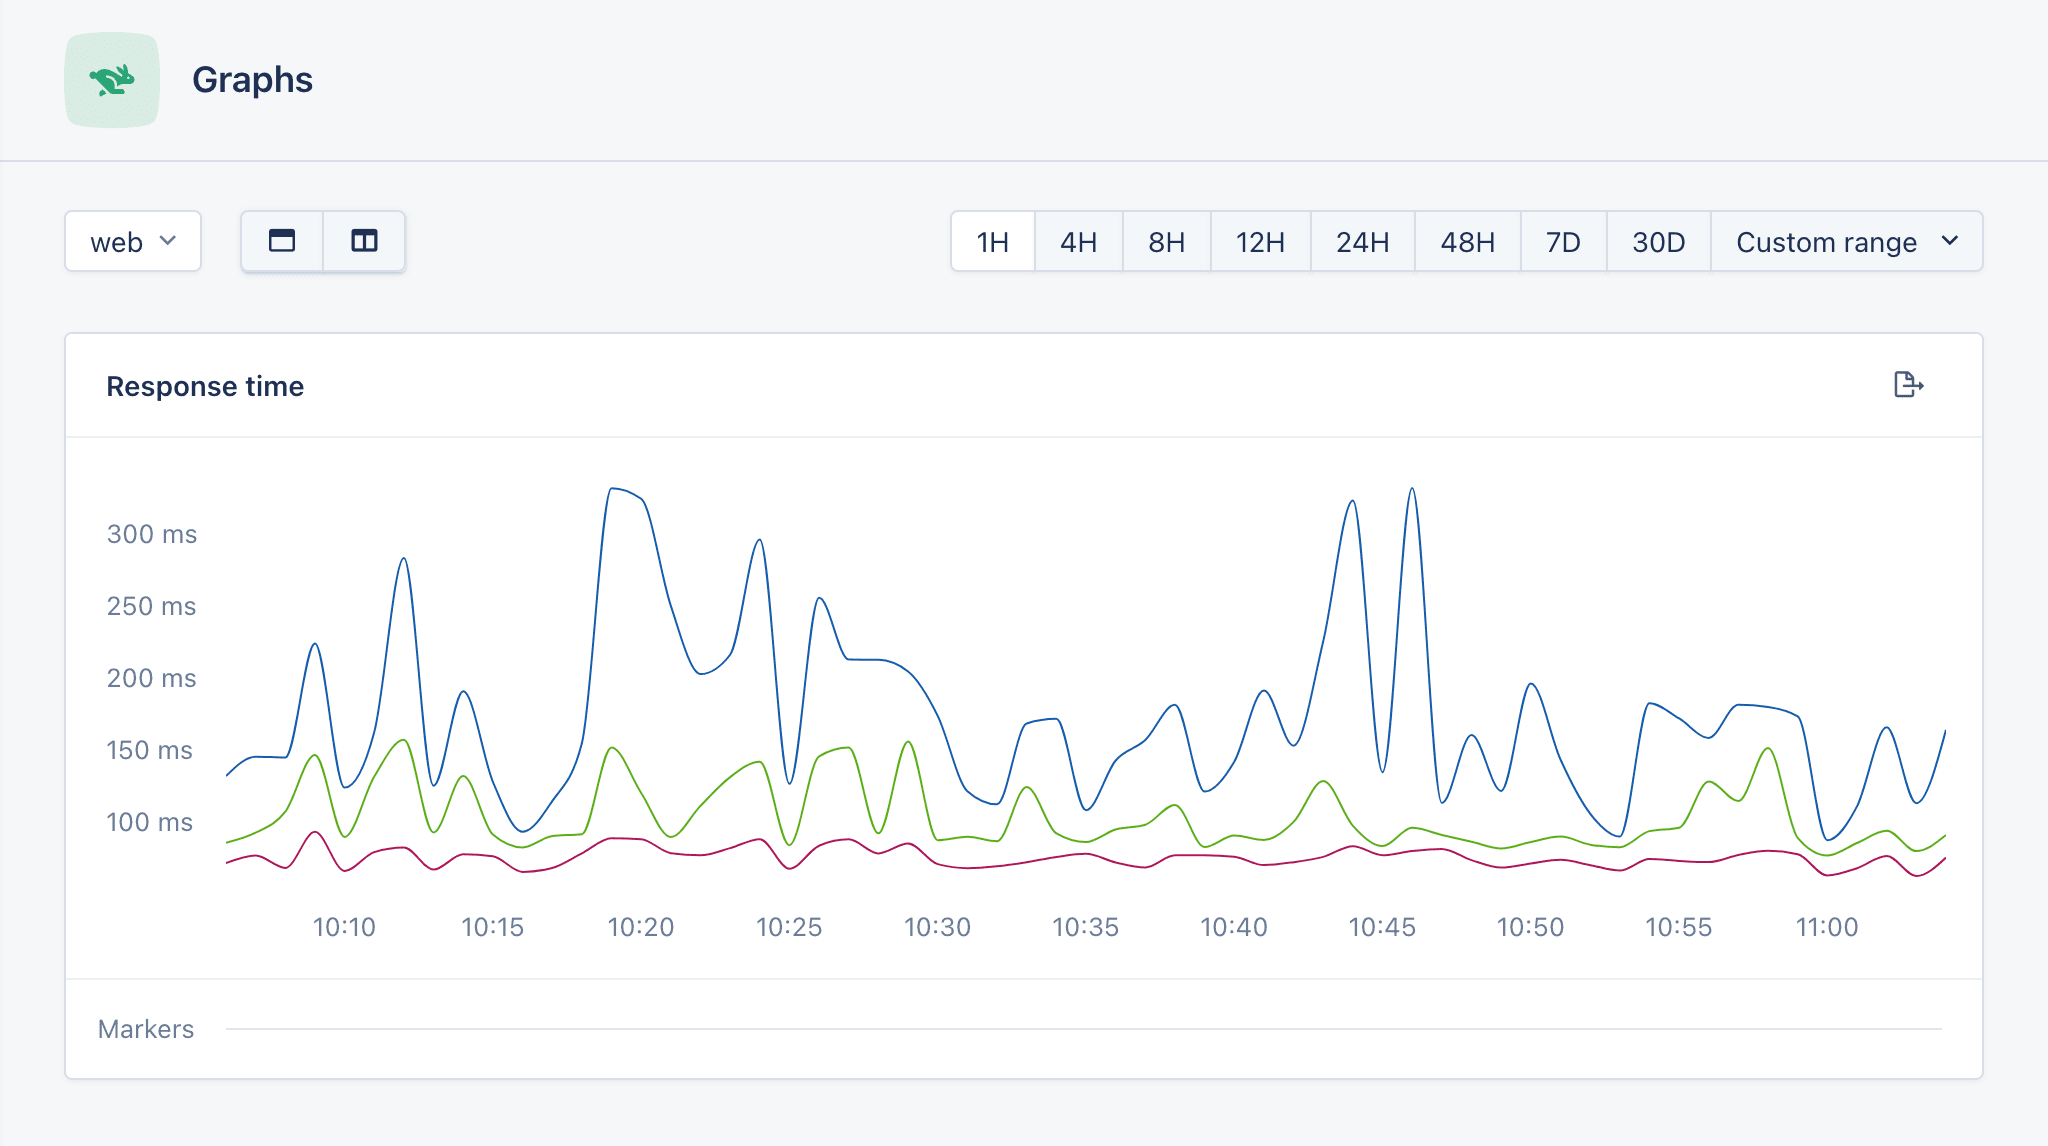
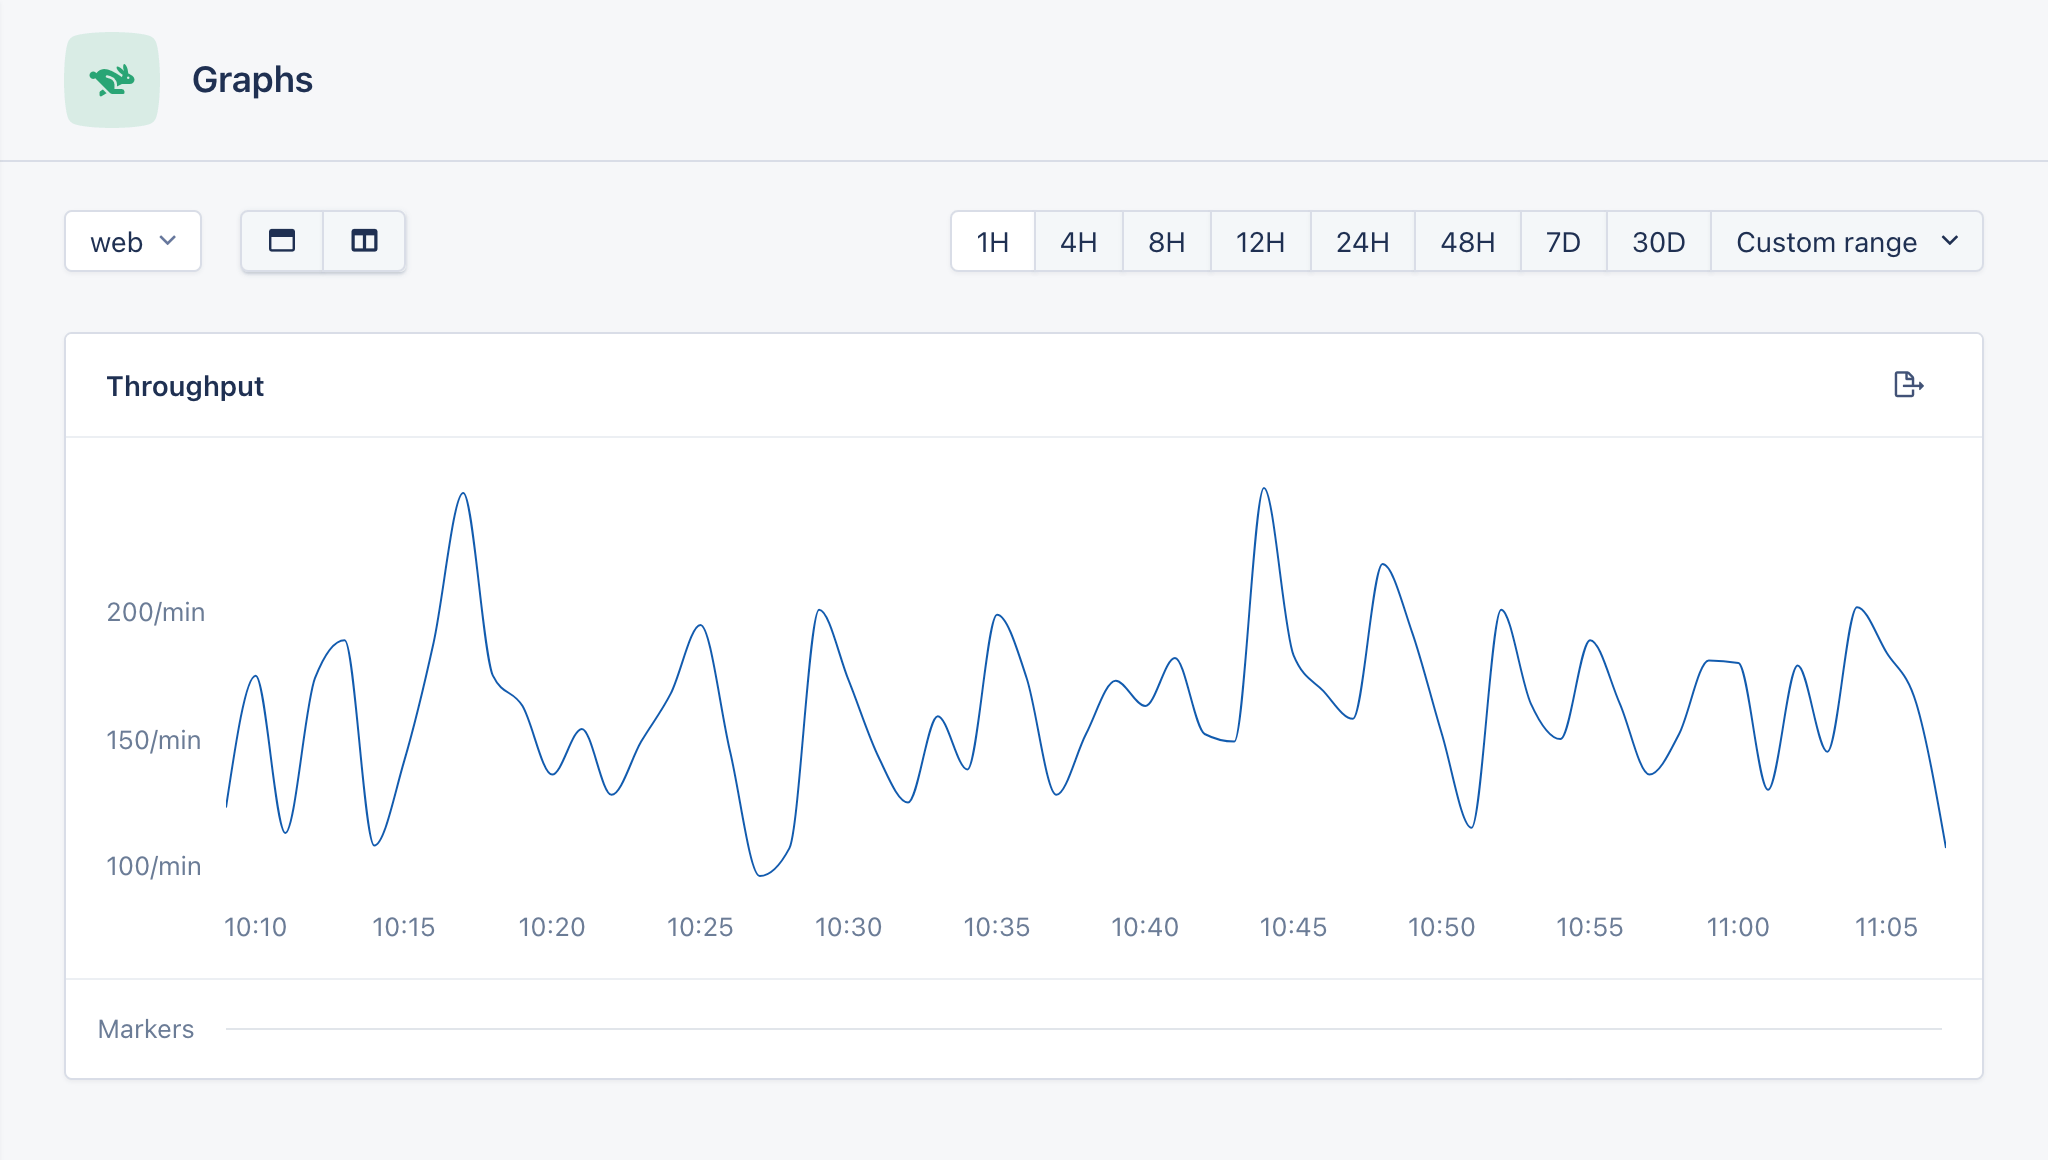
Before choosing a timeout value, you can monitor the response times for APIs you connect to using specialized tools or track your API calls by logging them. This will allow you to make an informed decision for all the external services that your program interacts with. You should also have a retry strategy in place for important services to account for temporary slowdowns. The graph below shows how average the response times for an endpoint can be monitored in AppSignal.
4. Don't Serve Static Assets with Node.js
To ensure the best possible performance for your Node.js servers, refrain from using them to serve static assets like JavaScript, CSS, or image files from your application. Node.js wasn't designed with this use case in mind, so serving assets from the main application consumes valuable resources and holds up important business computations. Offload the task of serving static files to a web server like Nginx, which can perform optimizations that does not make sense for Node.js to do. This test shows that Nginx is about twice as fast at delivering static assets as Node.js (using Express static middleware).
Another option to serve static files is to set up a CDN proxy like Amazon CloudFront to cache your static content and serve it as close as possible to end-users. This frees up the Node.js servers to handle dynamic requests only.
5. Use Clustering to Improve Throughput
Clustering is a technique used to horizontally scale a Node.js server on a single machine by spawning child processes (workers) that run concurrently and share a single port. It is a common tactic to reduce downtime, slowdowns and outages by distributing the incoming connections across all the available worker processes so that available CPU cores are utilized to their full potential. Since a Node.js instance runs on a single thread, it cannot take advantage of multi-core systems properly - hence the need for clustering.
You can cluster your Node.js server through the cluster module in the standard library. Here's an example taken from the official documentation:
1const cluster = require("cluster");
2const http = require("http");
3const process = require("process");
4const os = require("os");
5
6const cpus = os.cpus;
7
8const numCPUs = cpus().length;
9
10if (cluster.isPrimary) {
11  console.log(`Primary ${process.pid} is running`);
12
13  // Fork workers.
14  for (let i = 0; i < numCPUs; i++) {
15    cluster.fork();
16  }
17
18  cluster.on("exit", (worker, code, signal) => {
19    console.log(`worker ${worker.process.pid} died`);
20  });
21} else {
22  // Workers can share any TCP connection
23  // In this case it is an HTTP server
24  http
25    .createServer((req, res) => {
26      res.writeHead(200);
27      res.end("hello world\n");
28    })
29    .listen(8000);
30
31  console.log(`Worker ${process.pid} started`);
32}
Once you run this program, connections sent to port 8000 will be shared between the worker processes. This will lead to more efficient requests management in the application:
1$ node server.js
2Primary 15990 is running
3Worker 15997 started
4Worker 15998 started
5Worker 16010 started
6Worker 16004 started
A downside to using the native cluster module in Node.js is the amount of code you need to write to spawn and manage the workers, and it is not possible to modify the number of processes on the fly.
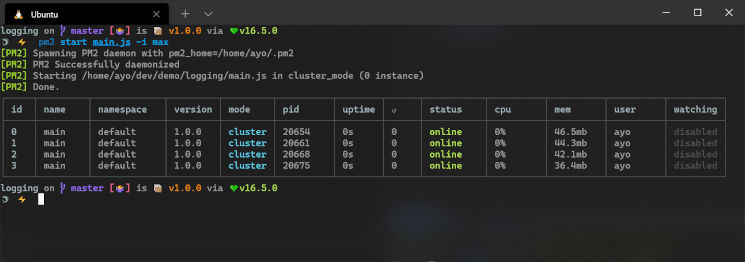
For more robust management of Node.js clusters, use the PM2 process manager for Node.js. It uses the cluster module under the hood and takes care of spawning workers, stopping or restarting workers, and distributing the incoming load between the workers. It also provides some tools to help you monitor and tweak the performance of worker processes:
6. Scale across Multiple Machines with a Load Balancer
Scaling your Node.js application horizontally across multiple machines is similar to scaling across multiple cores on a single machine. As long as your application can run as an independent process, it can be distributed to run across several machines. The major requirement is using a load balancer to distribute incoming traffic to the servers (similar to how the cluster module is used to direct traffic to the child worker process). You can even have multiple load balancers that point to the same set of servers to avoid a single point of failure.
7. Utilize Worker Threads for CPU-intensive Tasks
Worker threads provide a mechanism to run CPU-intensive tasks in a Node.js application without blocking the main event loop. They were introduced in Node.js v10.5.0, and only became stable in the v12.0.0 release.
A worker thread is spawned by the main or parent thread, and its responsibility
is to perform a task in isolation from other workers. Unlike child processes or
clusters, worker threads can share memory by transferring ArrayBuffer
instances or sharing SharedArrayBuffer instances. A worker and their parent
can also communicate in both directions using a message channel.
Here's how to create a worker thread using the worker_threads module from the
standard library:
1// main.js
2const { Worker } = require("worker_threads");
3
4// Create a new worker
5const worker = new Worker("./worker.js");
6
7// Listen for messages from worker
8worker.on("message", (result) => {
9  console.log(
10    `The prime numbers between 2 and ${result.input} are: ${result.primes}`
11  );
12});
13
14worker.on("error", (error) => {
15  console.log(error);
16});
17
18worker.on("exit", (exitCode) => {
19  console.log(exitCode);
20});
21
22// Send messages to the worker
23worker.postMessage({ input: 100 });
24worker.postMessage({ input: 50 });
When main.js is executed, it spawns a new worker thread derived from the
worker.js file. The postMessage() method sends messages to the worker, and a
listener is used to detect responses from the worker. The worker.js file is
shown below:
1const { parent } = require("worker_threads");
2
3parent.on("message", (data) => {
4  parent.postMessage({
5    input: data.input,
6    primes: getPrimes(data.input),
7  });
8});
9
10function getPrimes(max) {
11  const sieve = [],
12    primes = [];
13
14  for (let i = 2; i <= max; ++i) {
15    if (!sieve[i]) {
16      primes.push(i);
17
18      for (let j = i << 1; j <= max; j += i) {
19        sieve[j] = true;
20      }
21    }
22  }
23
24  return primes;
25}
In the above snippet, the getPrimes() function is used to find all the prime
numbers between 2 and the specified argument which is received from the parent
through the message listener. The result is also sent back to the parent by
using the postMessage() method as before:
1The prime numbers between 2 and 100 are: 2,3,5,7,11,13,17,19,23,29,31,37,41,43,47,53,59,61,67,71,73,79,83,89,97
2The prime numbers between 2 and 50 are: 2,3,5,7,11,13,17,19,23,29,31,37,41,43,47
Read the official documentation of the worker_threads
module to learn more about using
Node.js workers to your advantage.
Additional Tips to Improve Node.js Performance
Here are some micro-optimizations you can make in your Node.js application to reliably get better results:
Always use the latest release of Node.js to get the best possible performance.
Pay attention to your dependencies, and choose the most performant libraries where possible. Sometimes, it is better to forgo adding a dependency and instead write the code to perform a task yourself.
Ensure that all independent I/O operations use asynchronous primitives like callbacks, promises, and async/await to ensure a non-blocking operation flow and improve downstream latency.
You don't have to optimize everything. Once the hotspots of your application are well optimized, stop.
Your hot spots may change over time, so make sure to use some form of observability or monitoring solution to track these changes.
When working with large pieces of data, use Node.js streams for optimal memory efficiency and reduced latency.
To reduce the load on the garbage collector (thus reducing latency), avoid memory allocations in hotspots.
Optimize your database queries, and scale them appropriately to ensure that they do not become a bottleneck.
Don't trade performance for reliability. Try to strike a balance between tuning your code for performance, the cost of development, and continued maintenance.
Wrap-up: Scale Your Node.js Application by Improving Performance
In this article, we've covered some practical tips to help you scale your Node.js application to handle more traffic. Before implementing a specific optimization, ensure you run comprehensive performance tests on your system and use the insights you gain to determine what course of action to take. Also, use observability/monitoring tools so that you can see the impact of your changes and spot regressions quickly and reliably.
If you have any additional tips regarding performance optimization in Node.js that were not discussed in this post, feel free to share them with me on Twitter.
Thanks for reading, and happy coding!
P.S. If you liked this post, subscribe to our JavaScript Sorcery list for a monthly deep dive into more magical JavaScript tips and tricks.
P.P.S. If you need an APM for your Node.js app, go and check out the AppSignal APM for Node.js.
Our guest author Ayo is a Software Developer by trade. He enjoys writing about diverse technologies in web development, mainly in Go and JavaScript/TypeScript. You can learn more about him through his blog.