
In this article, you'll learn how to capture error logs in your Cloudflare Workers application using AppSignal. We'll build a simple workers project and integrate AppSignal's code to collect the necessary metrics. We'll also learn how to utilize AppSignal's dashboard to analyze and track errors.
Let's get stuck in!
What Are Worker Functions in Cloudflare Workers?
Cloudflare Workers is a serverless platform that allows developers to build and quickly deploy backend logic using JavaScript. Unlike most serverless platforms, worker functions can respond to a request in less than 500 milliseconds in cold start conditions. Unfortunately, building a worker application does get frustrating at times due to the difficulty of debugging the code.
Here's a snapshot of the metrics collected from a deployed workers application:
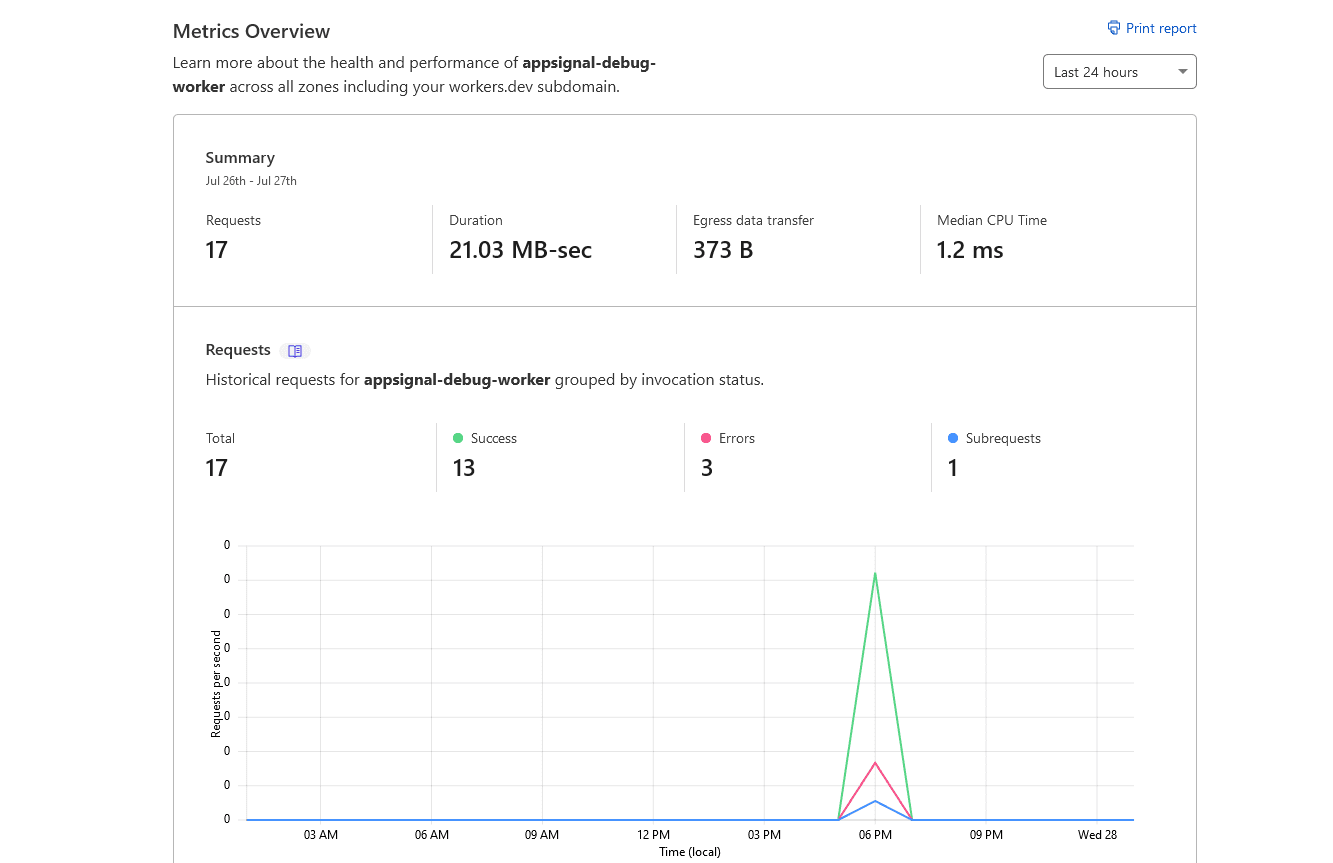
In the example above, the majority of the requests have passed, while a few have failed. Unfortunately, there's no way to dig into the dashboard for more information about errors.
The recommended solution is to use a remote logging service to capture error data. This service should have an intuitive dashboard that allows you to inspect the error messages captured.
Prerequisites
This article assumes you have at least a beginner's experience in building a Cloudflare Workers application. That means you should have:
- A Cloudflare Workers account
- The latest version of Wrangler CLI tool installed and authenticated to connect to your account
For ease in testing, we'll use the Visual Studio Code editor and REST Client extension.
Alternatively, you can use another code editor, but you'll have to use a tool like Postman to make GET and POST requests.
Project Setup
You can find the source code for the project we'll use in this article on GitHub. If you would like to follow along, set up a new workers application from scratch using the following commands:
1# scaffold project
2wrangler generate appsignal-debug-worker
3
4# navigate inside the project
5cd appsignal-debug-worker
6
7# install dependencies
8npm install
We'll build a simple POST request handler that calculates a person's age based on their date of birth. This POST handler will accept date information via JSON. We'll use the date-fns package to handle date calculations.
Install the package:
1npm install date-fnsUpdate index.js as follows:
1import { parseISO, differenceInYears } from "date-fns";
2
3addEventListener("fetch", (event) => {
4  event.respondWith(handleRequest(event.request));
5});
6
7async function handleRequest(request) {
8  if (request.method === "POST") {
9    return handlePostRequest(request);
10  } else {
11    return handleGetRequest(request);
12  }
13}
14
15/**
16 * Respond with hello worker text
17 * @param {Request} request
18 */
19async function handleGetRequest(request) {
20  return new Response("Hello worker!", {
21    headers: { "content-type": "text/plain" },
22  });
23}
24
25/**
26 * Respond with 'Hello, {name}. You are ${age} years old!' in json
27 * @param {Request} request
28 */
29async function handlePostRequest(request) {
30  const body = await request.json();
31  const { name, dob } = body;
32  // Calculate age
33  const dobDate = parseISO(dob);
34  const today = new Date();
35  const age = differenceInYears(today, dobDate);
36  const data = JSON.stringify({
37    message: `Hello, ${name}. You are ${age} years old!`,
38  });
39  return new Response(data, {
40    headers: { "content-type": "application/json" },
41  });
42}
Next, update the wrangler.toml file and ensure type has been set to webpack:
1name = "appsignal-debug-worker"
2type = "webpack"
3usage_model = "bundled"
4
5account_id = "<insert account id here>"
6workers_dev = true
Create a new rest.http file and copy the following HTTP request commands:
1# Test GET request
2GET http://localhost:8787/ HTTP/1.1
3
4###
5
6# Test POST - invalid request
7POST http://localhost:8787/ HTTP/1.1
8
9###
10
11# Test POST - valid request
12POST http://localhost:8787/ HTTP/1.1
13Content-Type: application/json
14
15{
16  "name": "John",
17  "dob": "1990-03-15"
18}
You can now use the command wrangler dev to launch the dev server. As the REST client is installed in VS Code, you can easily hover over each request and click the Send Request link. Execute all three request commands and take note of the response.
Below is the output of the invalid request:
1[2021-09-08 13:15:07] POST appsignal-debug-worker.brandiqa.workers.dev/ HTTP/1.1 500 Internal Server Error
2SyntaxError: Unexpected end of JSON input at line 0, col 0
3{
4  "exceptionDetails": {
5    "columnNumber": 0,
6    "exception": {
7      "className": "SyntaxError",
8      "description": "SyntaxError: Unexpected end of JSON input",
9      "preview": null,
10      "subtype": "error",
11      "type": "object",
12      "value": null
13    },
14    "lineNumber": 0,
15    "text": "Uncaught",
16    "url": "undefined"
17  },
18  "timestamp": 1631096101393
19}
As we are running on the dev server, we can easily take note of the error. However, once you publish your application, you won't be able to access this essential error information.
In the next section, we'll look at how you can integrate AppSignal to capture and send errors when your application runs in deployment.
Javascript Integration with AppSignal
Let's start by signing up for a new 30-day trial account (no credit card required). If you sign up with your email address, you'll need to go through the usual verification process. Afterward, the process is as follows:
- Create a new organization (or choose an existing one).
- Pick a language — choose JavaScript.
- Create an app — use
appsignal-debug-workerfor name andstagingfor environment. - Install the AppSignal JavaScript package. You'll be presented with your API key.
- Next, you'll be given a snippet of code to confirm whether you've successfully integrated AppSignal.
Steps 1 to 3 are pretty straightforward.
Let's go through steps 4 and 5. In your terminal, install the AppSignal package and upload the API key:
1# Install package
2npm install @appsignal/javascript
3
4# Upload api key
5wrangler secret put APPSIGNAL_API # supply your api key in the next prompt
To complete step 5, update index.js as follows:
1import Appsignal from "@appsignal/javascript";
2
3const appsignal = new Appsignal({ key: APPSIGNAL_API });
4
5async function handleGetRequest(request) {
6  appsignal.demo();
7  return new Response("Hello worker!", {
8    headers: { "content-type": "text/plain" },
9  });
10}
Run the wrangler dev command and execute the first GET request specified in your rest.http file. Your code should run as normal.
Go back to your AppSignal dashboard and navigate to the 'Errors' page. You should have received an incident report that looks similar to the following screenshot:
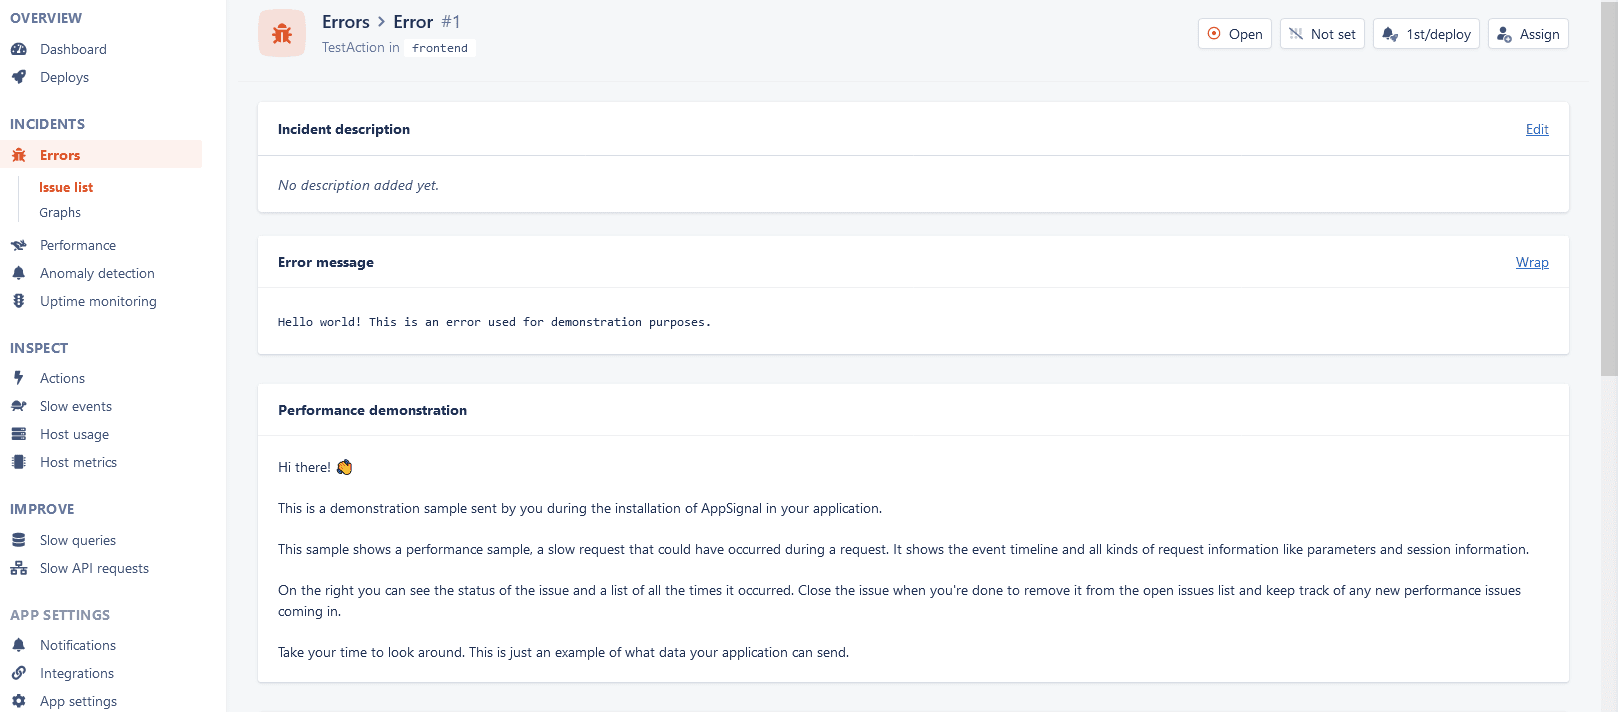
That's just a simple test to confirm that we've successfully integrated AppSignal into our project. In the next step, we'll look at how we can actually implement error reporting in existing code.
Remove the appsignal.demo() line before you proceed.
How to Send Errors to Your AppSignal Dashboard
There are a couple of ways we can catch and send errors to our AppSignal dashboard using the JavaScript API. We can use the appsignal.sendError(error) error:
1try {
2  // write main logic here
3} catch (error) {
4  appsignal.sendError(error);
5}
A second option is to use the appsignal.wrap() function as follows:
1try {
2  await appsignal.wrap(() => {
3    // write main logic here
4  });
5} catch (e) {
6  // return error response, the error
7  // has already been sent to AppSignal
8}
Here's a clearer example, involving asynchronous code:
1async function handlePostRequest(request) {
2  try {
3    const data = await appsignal.wrap(async () => {
4      // write main logic here
5    });
6    // return success response
7    return new Response(data, {
8      headers: { "content-type": "application/json" },
9    });
10  } catch (error) {
11    // return error response
12    return new Response(error, {
13      headers: { "content-type": "text/plain" },
14      statusText: error,
15      status: 500,
16    });
17  }
18}
When you use the wrap method, any errors within the block are captured and automatically sent to your AppSignal dashboard.
Next up, we'll look at how we can send more error information.
Using Breadcrumbs to Help Find Errors
Breadcrumbs can provide additional information about an error. The information is sent to your dashboard, which should help you with re-tracing the cause of the problem in your code.
The syntax is as follows:
1appsignal.addBreadcrumb({
2  category: "", // e.g. "UI", "Network", "Navigation", "Console"
3  action: "", // e.g "The user clicked a button", "HTTP 500 from http://blablabla.com"
4  metadata: {}, // key/value metadata in <string, string> format
5});
Here's a more complete example that you can use to update index.js:
1/**
2 * Respond with 'Hello, {name}. You are ${age} years old!' in json
3 * @param {Request} request
4 */
5async function handlePostRequest(request) {
6  try {
7    const body = await request.json();
8    const { name, dob } = body;
9    // Calculate age
10    const dobDate = parseISO(dob);
11    const today = new Date();
12    const age = differenceInYears(today, dobDate);
13    const data = JSON.stringify({
14      message: `Hello, ${name}. You are ${age} years old!`,
15    });
16    return new Response(data, {
17      headers: { "content-type": "application/json" },
18    });
19  } catch (error) {
20    return handleError(error, {
21      category: "Backend",
22      action: "handlePostRequest",
23      metadata: {
24        fileName: "index.js",
25        message: error.message,
26        foo: "bar",
27      },
28    });
29  }
30}
31
32function handleError(error, breadcrumb) {
33  appsignal.addBreadcrumb(breadcrumb);
34  appsignal.sendError(error);
35  return new Response(error, {
36    headers: { "content-type": "text/plain" },
37    statusText: error,
38    status: 500,
39  });
40}
After updating the file, launch the dev server and test all the HTTP REST URLs. The valid POST request should return the following similar response:
1HTTP/1.1 200 OK
2date: Wed, 08 Sep 2021 10:16:57 GMT
3content-type: application/json
4expect-ct: max-age=604800, report-uri="https://report-uri.cloudflare.com/cdn-cgi/beacon/expect-ct"
5report-to: {"endpoints":[{"url":"https:\/\/a.nel.cloudflare.com\/report\/v3?s=qS42jXbBLK13PlG6m1o4sBYLw%2B%2Bbp79hiVQ%2BSR8hRI85U548xXWp3NCG7T6vIDMUQcMMDkG%2FZPOM0elIzB3vs1UXWNUiLQkErgzi%2FgzpnBSubg%2FxLjOSj6lO4osFYCxe9UL1x691hEBEQAHz1ku9hgc17r7jjMA3WrhndnaT"}],"group":"cf-nel","max_age":604800}
6nel: {"success_fraction":0,"report_to":"cf-nel","max_age":604800}
7vary: Accept-Encoding
8cf-ray: 68b76c9d5dadd73d-DAR
9content-encoding: gzip
10alt-svc: h3=":443"; ma=86400, h3-29=":443"; ma=86400, h3-28=":443"; ma=86400, h3-27=":443"; ma=86400
11server: cloudflare
12transfer-encoding: chunked
13{
14  "message": "Hello, John. You are 31 years old!"
15}
The invalid POST request will output the same as before.
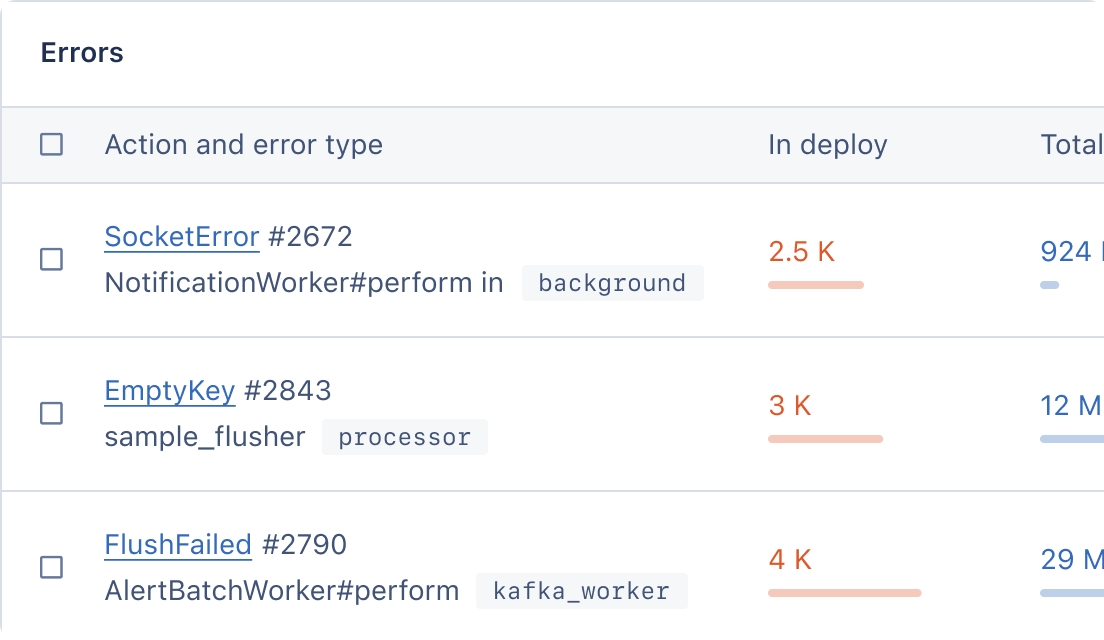
Let's now take a look at our AppSignal dashboard and what information got captured. The above type of error is placed under the SyntaxError entry. See the screenshot below for comparison:
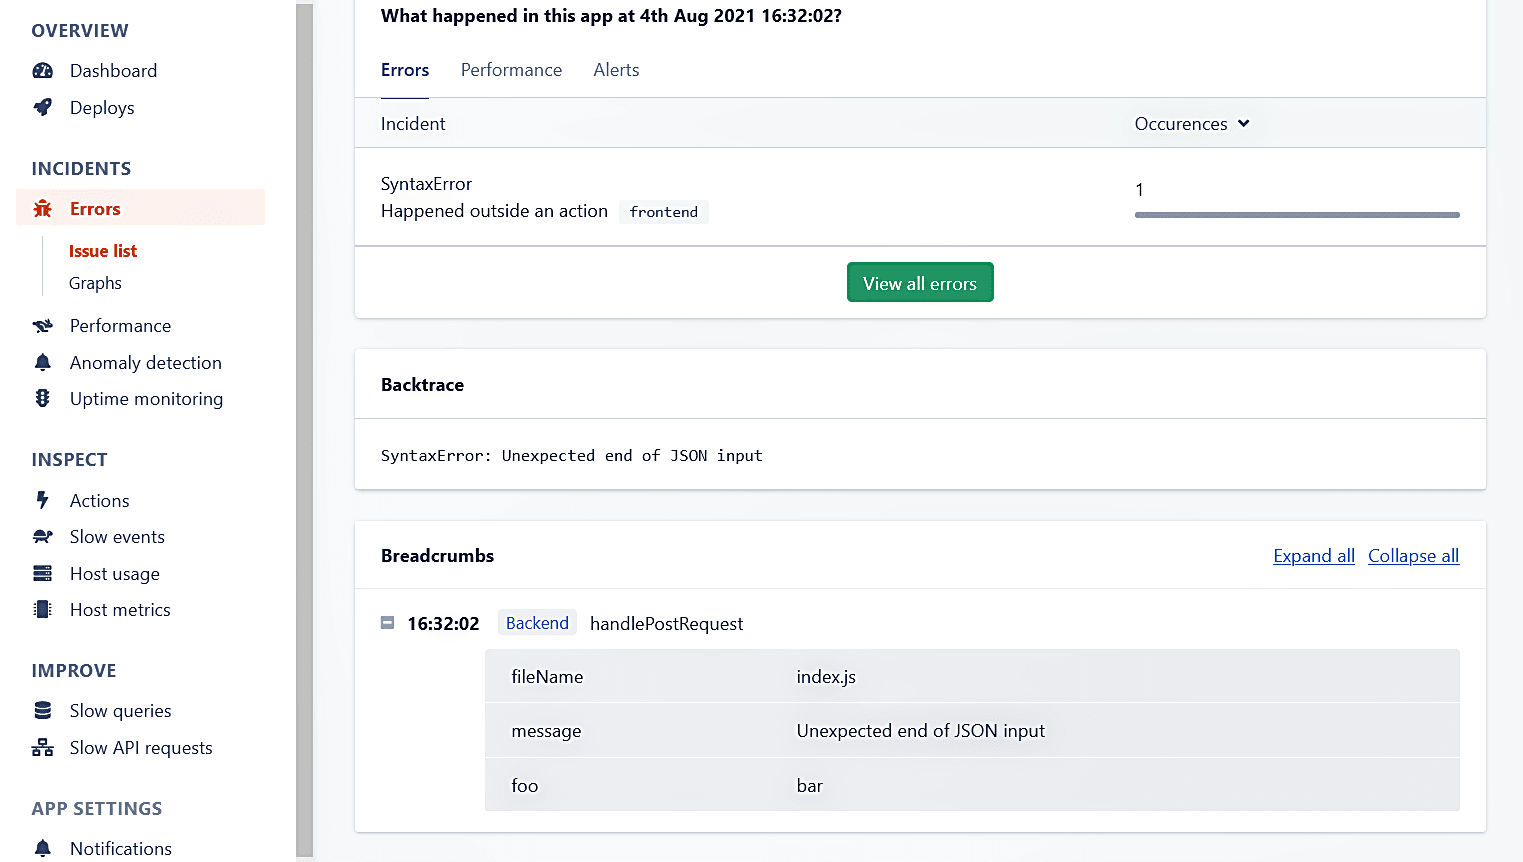
As you can see, all the data we included in the addBreadcrumbs function has been captured. Implementing this strategy in your code will help you debug your code in production better.
Troubleshoot Your Errors Easily with AppSignal
To recap, we've learned how to:
- Integrate AppSignal into our workers code using the
@appsignal/javascriptnpm package - Use the
appSignal.sendError()function to send error data - Use the
appSignal.wrap()function to automatically capture and send error data - Use the
breadcrumbsfunction to send additional details about an error
While AppSignal provides a myriad of features, including performance and anomaly tracking, the @appsignal/javascript package only supports the error reporting feature.
Even so, error reporting allows you to build and deploy your worker applications with confidence. You'll be able to quickly troubleshoot problems before end-users submit support tickets.
P.S. If you liked this post, subscribe to our JavaScript Sorcery list for a monthly deep dive into more magical JavaScript tips and tricks.
P.P.S. If you need an APM for your Node.js app, go and check out the AppSignal APM for Node.js.